Before going through documentation chapters, thanks for purchasing PrivateContent and trusting LCweb!
Need further help?
Need a customization?
On first plugin's activation, it must be activated in order to work.
Head to the LCweb Dashboard page: it contains the summary of all LCweb products with useful links and their validation forms.

LCweb Shop License:
Your license is automatically registered into the LCweb database, you only need to
- go to your licenses dashboard and select the section your product belongs to (if you own only one product, you will be automatically moved)
- Scroll down until you find the license you want to use for the website and click on the pencil button
- Insert the website domain and save. The system will give you the activation token
- Copy and paste it into the LCweb dashboard, on your website
Envato Marketplace License:
In this case you need to manually register on the LCweb Licenses Hub
- Go to the LCweb Licenses Hub and, if you never registered, do it. You will have to validate your e-mail and use a login token in order to enter.
- Once you are in, select the section your product belongs to (if you own only one product, you will be automatically moved)
- Scroll down until you find the product and click on the PLUS button. A form will prompt you to enter the Envato purchase code (how to get it?) and the website domain
- Once saved, the system will give you the activation token
- Copy and paste it into the LCweb dashboard, on your website
In case you have an intranet or localhost website (or your server is blocking external communications against the LCweb endpoint) you can use the offline activation.
Click on the related link (in the LCweb Dashboard) and fill in the form with the requested data: the offline token can be found following the steps listed above.
Be careful using CACHE SYSTEMS. PrivateContent is based on dynamic content changes, then you MUST AVOID static cache systems (eg. WP Super Cache, WP Fastest Cache, etc).
The suggested cache setup uses true server-side systems: for example on the LCweb's website Cloudflare + LC Scripts Optimizer + OPcache + Redis Object Cache are used.
On multisite WordPress installations the plugin must be activated individually on any subsite and every subsite will have its own users database
Once plugin has been activated, there are a couple of mandatory steps required in order to use the plugin:
- Create at least one user category
- In plugin settings define the "Main redirect target for restricted pages" and the "Default category for registered users" into the registration tab
Once this has been done, PrivateContent will be ready to be used in all its sections.
- Targeted user categories assignments
-
In user categories page you can now define WordPress users able to manage targeted privateContent users belonging to targeted categories.
NB: WP users owning the "WordPress users interactions > Minimum role to manage users" role, are able to edit any PvtContent user.
As per LCweb's philosophy, PrivateContent contains a huge number of options to let you tailor it on your website and satisfy as many users as possible. Each option has got its legend aside: because of this in most cases you will learn to use it simply navigating among them.
However could be useful to learn a bit about few specific sections
- Main Options > Users Reserved Page
- These options refer to user personal page, or if you prefer, the reserved area. Targeted page contents will be overwritten for each logged user. Obviously you can also turn this feature off.
- Main Options > Contents hiding system
- These options refer to the "contents hiding" system, please check the restriction wizard section to know more.
- Main Options > WordPress users interactions
-
This section defines how "normal" WordPress users will interact with restriction contents.
- "Minimum role" refers on WordPress capabilities hierarchy. These users will also bypass any PvtContent restriction.
- "PrivateContent admin" is a new user role introduced in PrivateContent v8 and should be used uniquely to create users able to manage one or more PvtContent user categories without having any olther WordPress capability
- Custom Restrictions tab
- This is a complementary system useful to restrict targeted site URLs not bindable by other restrictions systems and should NOT be used in other cases
This plugin section is totally optional.
Use it only if you really need to integrate PrivateContent users with WordPress systems (eg. page comments or WooCommerce)

This system basically associates one mirror WordPress user to a PrivateContent user. This is essential to let them interact with WP-based systems (comments, woocommerce, etc). Users will still be managed through the privateContent interface.
- To be synced, a privateContent user must have a valid and unique e-mail
- Username and e-mail must not match with ones already used for existing WP users
- You must not edit or delete synced wordpress users or you will lose the sync.
- Once synced, you can't edit a privateContent username or e-mail. You must detach him before
- For the same reason also User Data add-on custom forms won't have e-mail field if this system is enabled
- Of course you can't be logged as WP admininstrator and as synced pvtContent user at the same time
- Synced users will be able to log in/out also through wordpress forms
- Detaching a user you will automatically delete the WordPress mirror
- Mirror WordPress users have got pvtcontent role and can't enter the admin area
- Additional roles can be emulated, adding capabilities to synced users.
This is managed in the related settings area
- Synced WordPress users are hidden in the WP users list: they must be managed through PrivateContent
- WordPress roles emulation
-
You might need to associate synced users with specific WordPress roles.
For example, you need the "customer" role to let users purchase from WooCommerce.The emulation can be global (through the related settings field) or user-specific (through te dedicated box in the user dashboard)
Worth rememering, you can also manually insert users throug the "Add User" admin menu
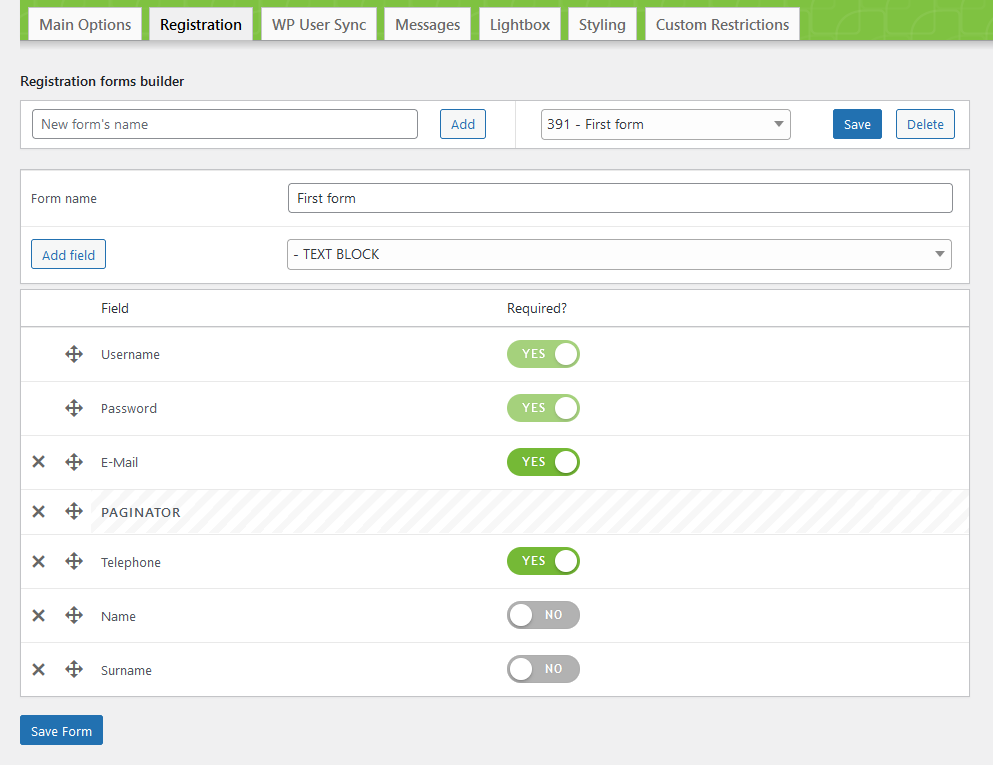
PrivateContent has got a lot of different options related to frontend user registration: because of this is strongly suggested to take a look into the "registration" settings tab.
Once you configured them as you prefer, it's time to create or customize your registration forms.
Once your forms are composed as per your preference, it's time to insert it in your pages. Remembering they can be placed anywhere in your website, Check the "shortcode wizard"
- HTML5 fields validation
-
PrivateContent has got an HTML5 form validation engine acting on client-side. This offers detailed error reports to user and avoid multiple server calls. It also integrates with form sections. If fields aren't correct, user can't move to next form's section.
- Anti-spam systems
-
By default PrivateContent has got an invisible "honey pot" system. It is almost secure as reCAPTCHA, anyway you can always choose to use this latter one. PrivateContent integrates Google invisible reCAPTCHA. You are now asked to register on Google's site and insert site + secret keys.
- Using WordPress forms
-
Using WP user sync system, you can also use any registration form you may have on your website to create PrivateContent users. Newly registered users will be automatically turned into PrivateContent users.

In PrivateContent this defines the strictly personal page contents each user has got. While the page URL is unique, contents will change depending on the logged user. Use this system only if you necessarily need to serve user-specific contents. In any other case, is better to restrict normal WordPress pages..
USEFUL NOTE: using Elementor is suggested to disable its "Improved CSS Loading" optimization. To not conflict with contents overriding.
- Output user contents via placeholder
- By default the system will exclusively replace the wrapper page contents through the wordpress "the_content" filter. However this is not always the best option, depending on the theme or builder you are using. Noticing bad results, try swiching to the other methods: replacing the entire page or injecting contents where the %PC-USER-PAG-CONTENT% placeholder is used (NB: the placeholder will be hidden for unlogged users).
- Output user contents via shortcode
- You can also avoid using the wrapper's page to output user contents. Through the [pc-user-pvt-page-contents] shortcode, you can place them wherever in your website. This could come very handy in combination with site builders.
- Private comments
- Using the WordPress user sync system, PrivateContent gives you the ability to communicate with users directly on their private page. It must be synced and comments must be enabled on its private page.
PrivateContent has got a powerful lightbox engine you can use to pop up forms or notifications or whatever you need.
Just one note about contents: they are AJAX loaded, then using javascript-based elements, be sure they are ok.
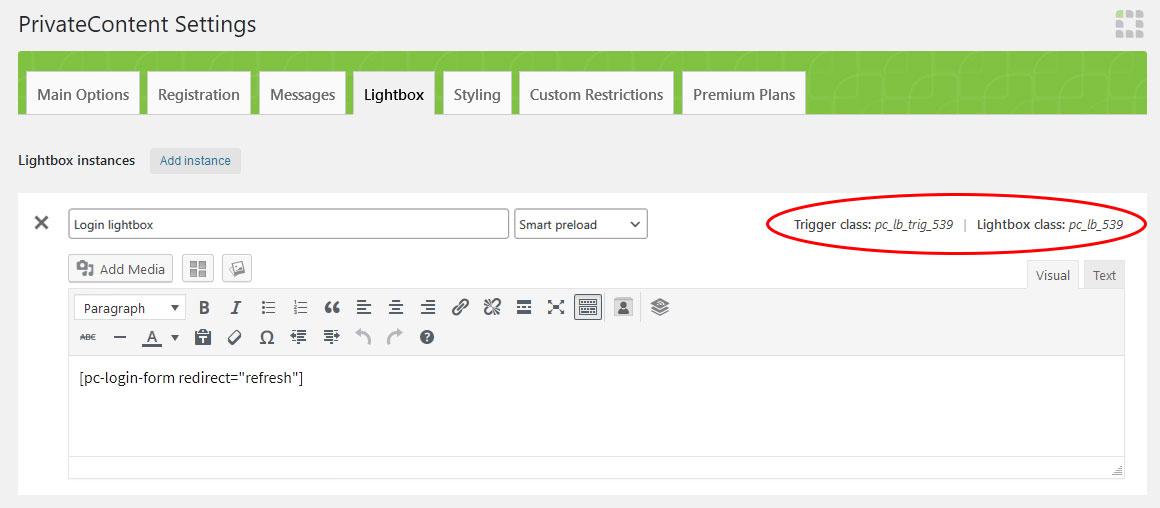
In settings you'll find the related lightbox wizard.
Once added, you'll note two classes in the upper-right corner: trigger class and lightbox class.
- Lightbox class
-
Wrapper class used in the lightbox, useful for CSS or javascript customizations
- Trigger class
-
Is the class needed to launch lightboxes. In fact lightbox instances can be linked to warning box buttons, but only through these classes you'll be able to use them everywhere in your website.
- Preload methods
-
By default the plugin loads lightbox contents only when needed. In case you use lightbox trigger classes, it might takes few moments to be ready. Having buttons with lightboxes linked, could worth using the "always preload", in order to be ready as soon as the page loads.
Let's see implementation examples:
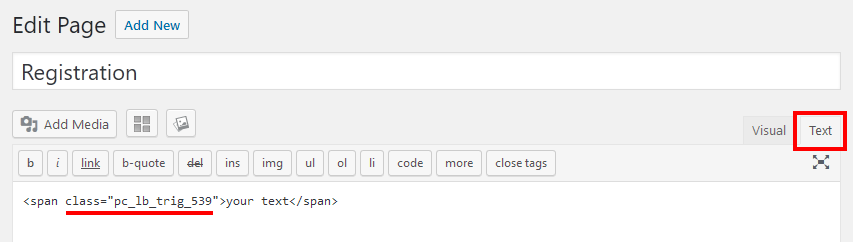
- Trigger lightbox from WP editor (or any HTML code)
-
Use the editor in TEXT mode and add the CLASS attribute to the element you wanna use as trigger
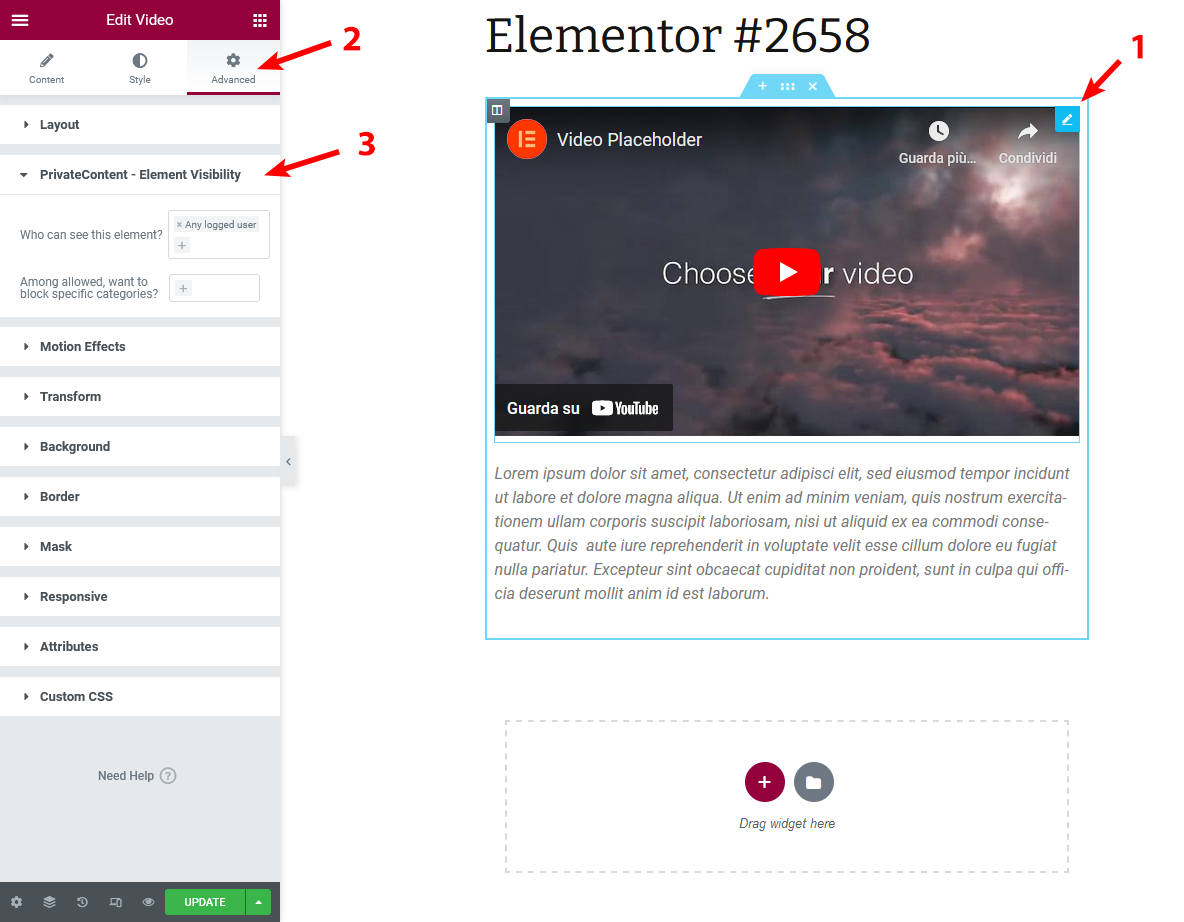
- Implementing lightbox in WPbakery/Elementor elements
-
In this screenshot a button has been taken into considereation, but almost any WPBakery's element has got an extra class field.
If you are using Elementor, just do the same in the related "element class" field.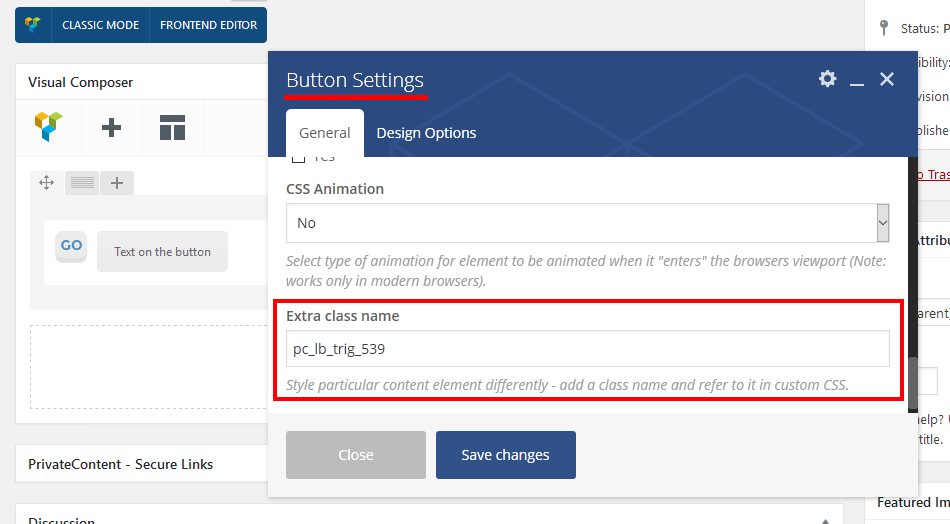
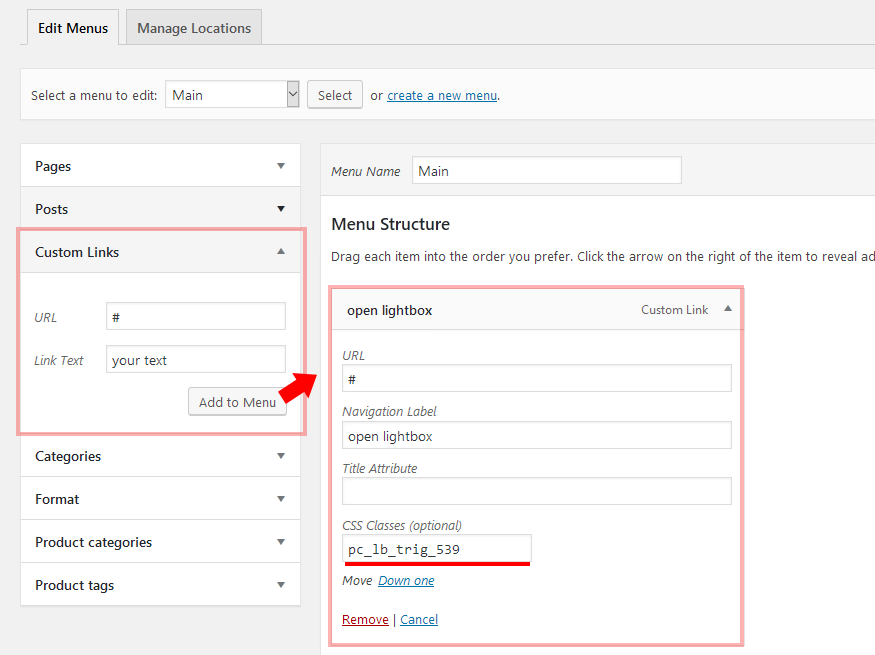
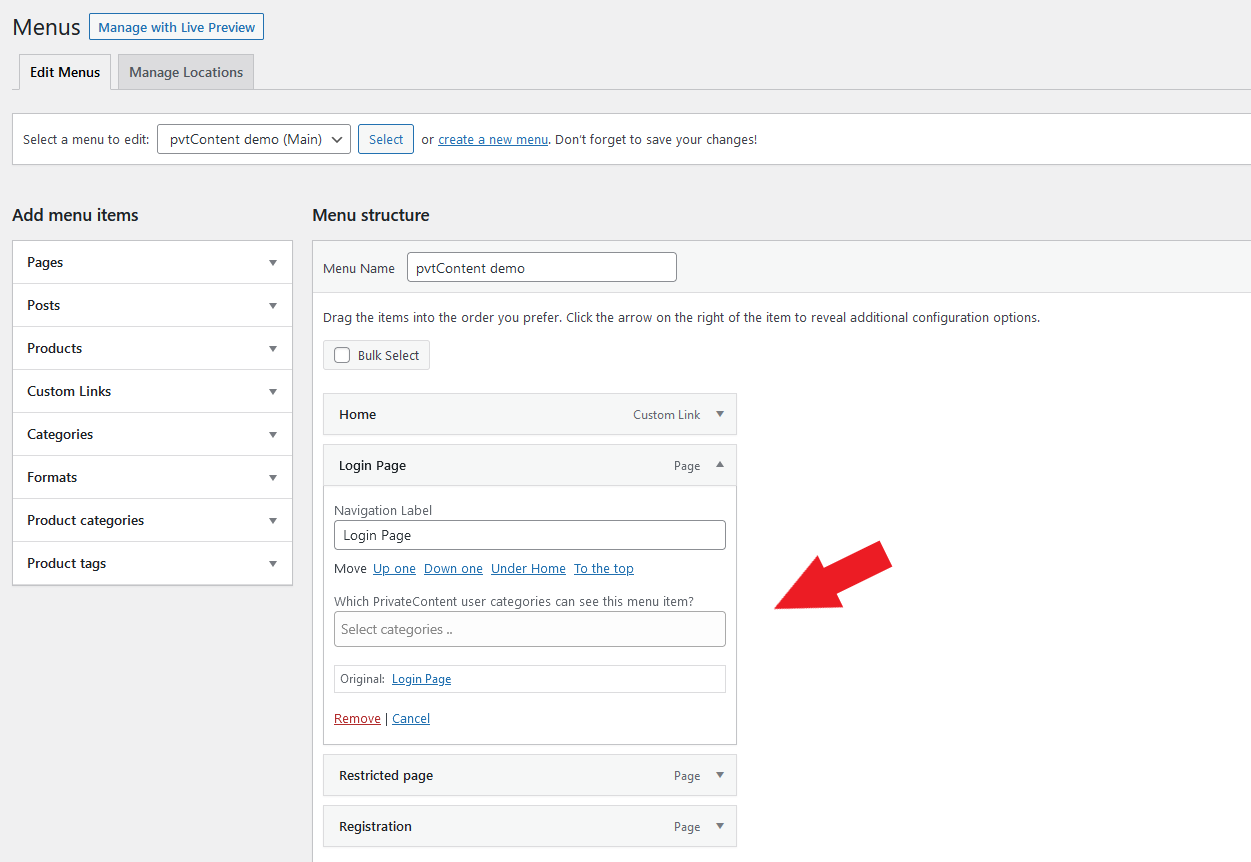
- Trigger lightbox using a wordpress menu item
-
Simply add a "Custom link" menu using an hash as URL and any text you need.
Then, once added, expand the menu item and add the class.FYI: if you don't see the class field, enable it through "Screen Options" flap, on top of the page.
PrivateContent is also natively integrated with the WordPress Block Editor (Gutenberg), WP Bakery, Elementor and Divi.
Using them, you can skip the standard shortcode wizard and use the related PrivateContent widgets/blocks.
PrivateContent is also natively integrated with the WordPress Block Editor (Gutenberg) and (in premium version) with WP Bakery, Elementor and Divi. Using them, you can skip the standard shortcode wizard and use the related PrivateContent widgets/blocks.
For any other builder or using the old WordPress editor:
Let's analyze all available shortcodes and their parameters:
• Private Block
[pc-pvt-content allow="all" block="" warning="1" message="1" login_lb="" registr_lb=""][/pc-pvt-content]
Used to hide specific page contents. Might show a warning box or just nothing
| allow | allows specific user categories (using IDs split by comma) or any user using all |
|---|---|
| block | blocks specific user categories. Acts only if you are allowing specific user categories (optional parameter) |
| warning | boolean flag to display/hide the yellow warning box (by default is shown) (optional parameter) |
| message | custom message to show in the warning box (by default is the one specified in the settings) (optional parameter) |
| login_lb | lightbox instance ID attached to "login" button. By default follows global option (optional parameter) |
| registr_lb | lightbox instance ID attached to "registration" button. By default follows global option (optional parameter) |
• Login Form
[pc-login-form redirect="" align="center"]
Simply displays login form (NB: obviously it won't be displayed to logged users)
| redirect | defines a forced custom redirect for this specific form (optional parameter) |
|---|---|
| align | defines form alignment. Possible values: center, left, right (optional parameter) |
• Logout Box
[pc-logout-box redirect=""]
| align | defines form alignment. Possible values: center, left, right (optional parameter) |
|---|
is possible to perform the logout by adding ?pc_logout to any site's URL. Example: mysite.com/?pc_logout
• Registration Form
[pc-registration-form id="" layout="" custom_categories="" redirect=""]
Used to display the registration form
| id | registration form id (if not specified, first registration form will be used) |
|---|---|
| layout | set form layout between one_col and fluid (by default is used what set in settings) (optional parameter) |
| custom_categories | defines a forced custom category or multiple categories (comma split) for registered users. It's discarded if you have categories field into the form (use categories ID) (optional parameter) |
| redirect | defines a forced custom redirect for this specific form (optional parameter) |
| align | defines form alignment. Possible values: center, left, right (optional parameter) |
• User Deletion Box
[pc-user-del-box redirect="" align="center"]
Allows user self-deletion from frontend
| redirect | defines a forced custom redirect for this specific button (optional parameter) |
|---|
By default any WordPress user bypasses any restricted content except users reserved page.
You can change this behavior in the plugin settings, limiting it to specific user roles with the "Minimum role to use the plugin" option

Understanding the restriction engine
PrivateContent restrictions are essentially based on user categories.
Developers might extend this behavior using plugin's API and introducing new checks though.
In any restriction block you will be asked to specify who can access. Leaving restriction options empty, no restriction will be applied.
A user can access restricted elements if he belongs to AT LEAST one condition.
For example if you allow "user category 1" and "user category 2", users belonging to "user category 1" OR "user category 2" will be able to access them.
You might be able to also block specific users, among allowed ones.
For example if you allowed "any logged user" and blocked "user category 1" and "user category 2", users belonging to "user category 1" OR "user category 2" won't be able to access contents.
Is useful to create dynamic switches. For example: show content X to unlogged and show content Y to logged.
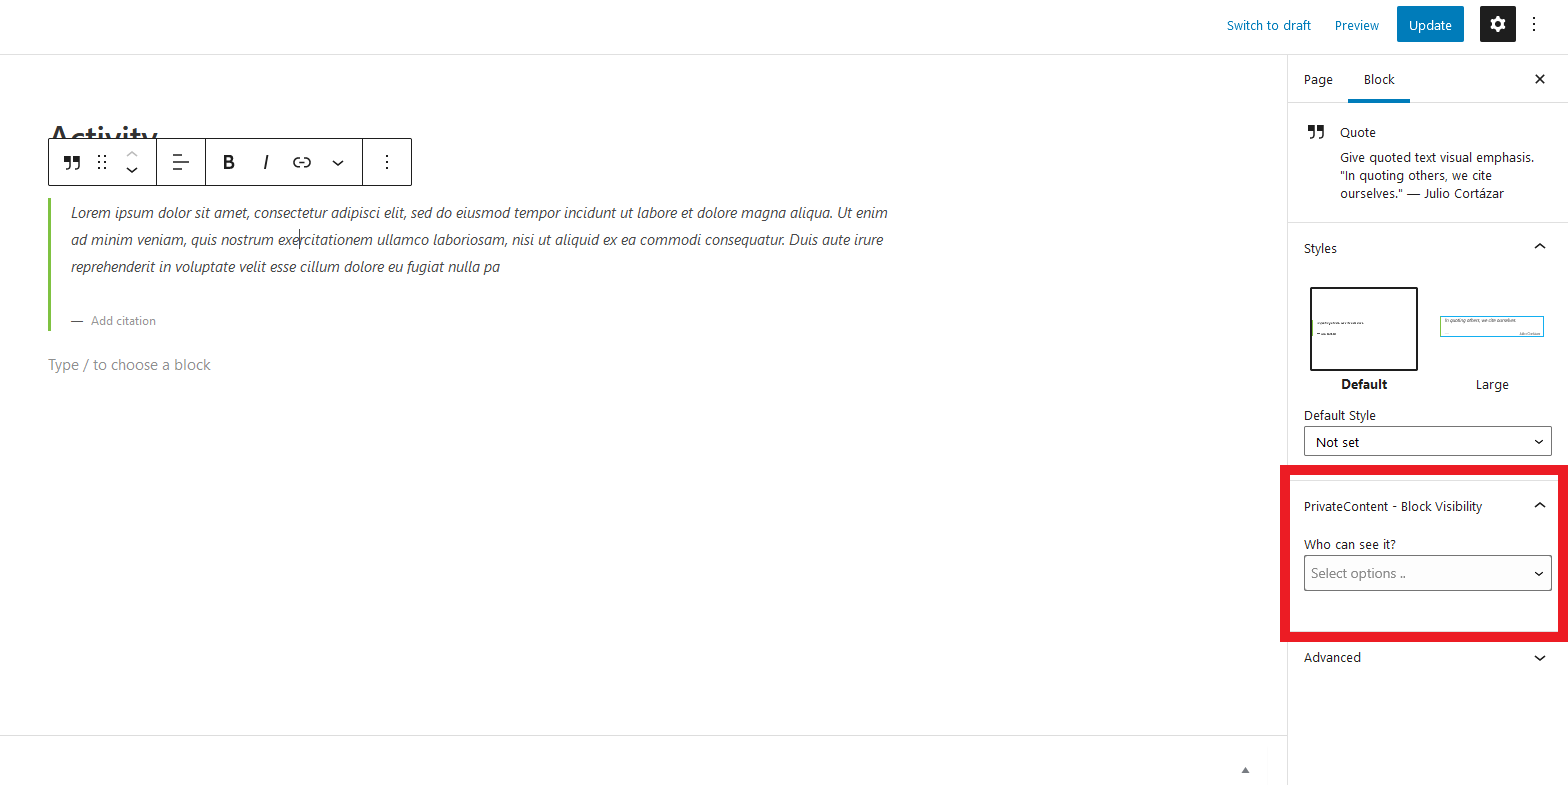
If you use Gutenberg (the default WordPress visual builder) or Elementor you can also set every block's visibility
GUTENBERG
It's the main PrivateContent tool to manage your restrictions. It is shown in any linked post type and taxonomy: by default for posts, categories and pages. Remember you can extend this to custom post types and taxonomies by selecting them in settings!

An essential concept to understand is the inheritance. These restrictions are inherited starting from categories, passing to parent post and ending with child post.
Then you can easily restrict multiple subjects by restricting a category or a common parent page.
Let's analyze its systems:

|
|
This section is available only if WooCommerce plugin is enabled
This restriction acts uniquely on external (not logged) users and basically hides product prices replacing them with a customizable text.
In addition, targeted products will be prevented from purchase if users are not logged in PrivateContent.
You can globally restrict any product by flagging the related settings option or use the Restrictions Wizard field to set which one is locked or not locked.

The restriction inheritance is identical to the one applied with redirects:
- single products inherit associated category restrictions
- child product categories inherit parent restrictions
- setting a specific value for a product or a category, the inheritance stops
Hidden price will be replaced by this default text "Login to see the price and purchase".
This can be changed in the related settings option.
There's a quicker way to manage the restrictions wizard: enter each page/category editor is terribly time consuming.
Because of this, wherever the restriction helper is shown, will be possible to display the wizard by double-clicking on it.
Within PrivateContent settings, you can also set custom restrictions, based on pages URL.
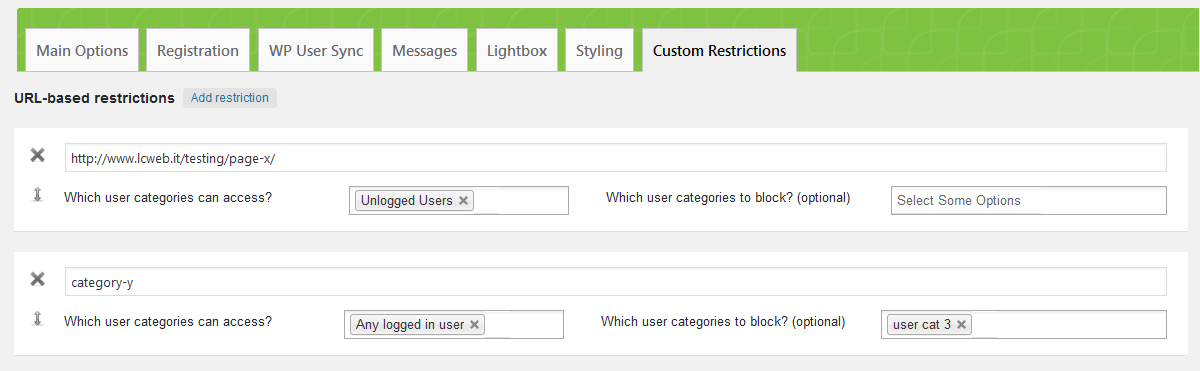
You can use a full URL or a regular expression, allowing you to control multiple pages at once.
In this image, for example, first restriction targets a single page while second one restricts any page having "category-y" in URL.
Each WordPress menu item can be restricted, just expand its aspect and you will see the related field
The field is attached to existing menu items. Be sure to save newly added items!
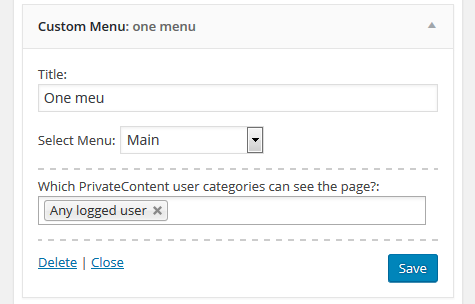
PrivateContent integrates also in WordPress widgets management area, allowing you to restrict every widget.
Just specify which user categories will be able to see them.
There's also a radical restriction option, to hide every website page, except the main redirect target (generally used for the login). You can find it in settings (main options tab)

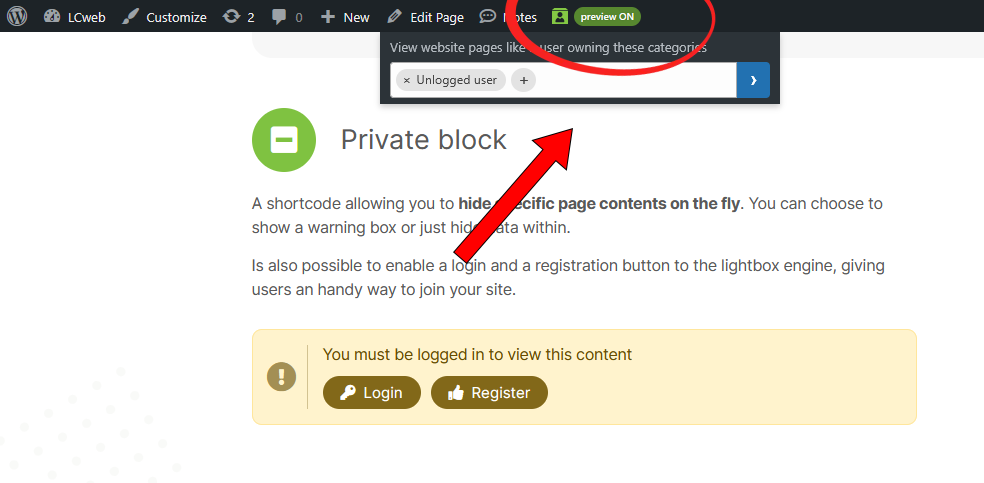
By default, any WordPress user able to manage PrivateContent elements bypasses frontend restrictions.
To preview frontend pages like a true PrivateContent user (or also like an external visitor) there is a special WordPress topbar element.
Click on it, select the user categories you want to emulate and submit.
The page will be refreshed and elements will be toggled accordingly to the preview setup you chose.

Through them you can generate/upload a JSON file containing various PrivateContent suite systems configurations. Has been ideally created to migrate a PrivateContent installation to another website.
Due to the fact WordPress systems are based on database table IDs, is not possible to create an exact copy, but things are projected to move the majority of the data without any hassle.
On import, existing setups will be overwritten: be careful on what you import. On production, a database backup is always suggested!
Users can be imported uploading whatever CSV file having at least the username, password and (if needed) e-mail columns.
Once uploaded, the wizard will let you match found data with related PrivateContent fields.
This section works exclusively for new users to be imported. If you want to update users data using a third-party CSV file, please use the related Import / Export Hub section.
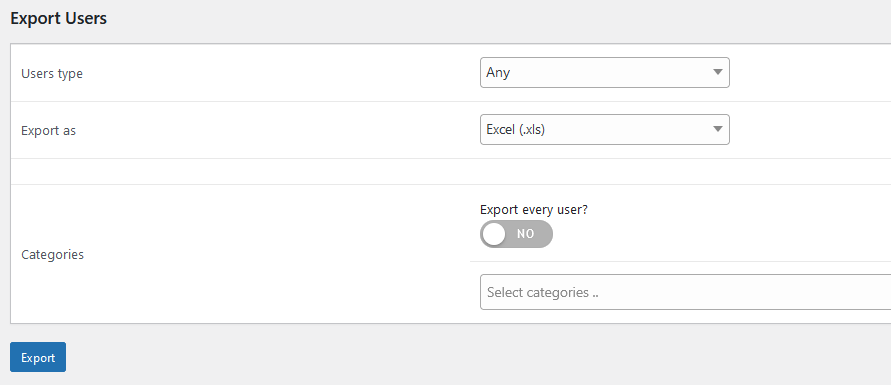
Select user status, file format and user categories you want to export.
The resulting file will be downloaded on your desktop.
This system is available only if WP User Sync is enabled

Just choose which user roles will be imported and which PvtContent user categories to assign.
Remember that sync can't be reverted without WP users deletion, then be careful to what you sync!
You can track every step a logged user makes on your website, thanks to the native Google Analytics implementation.
Please note Google prevents the usage of specific names/e-mails attributable to subjects.
Because of this a user-id-based string is used.
Analytics 4 involves various IDs, tokens to be set up. If you find it difficult, worth taking a look at the PrivateContent user activities add-on.
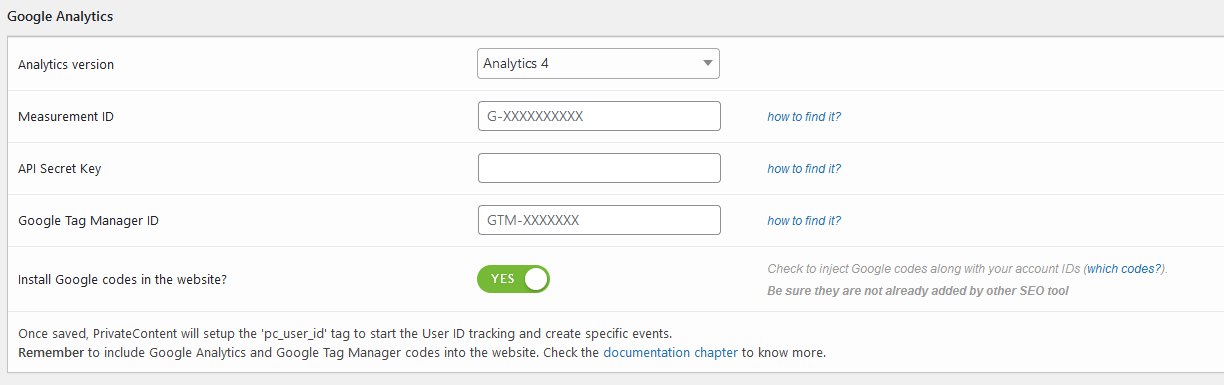
- Measurement ID
- Follow the Google guide to get it (LINK)
- API Secret Key
-
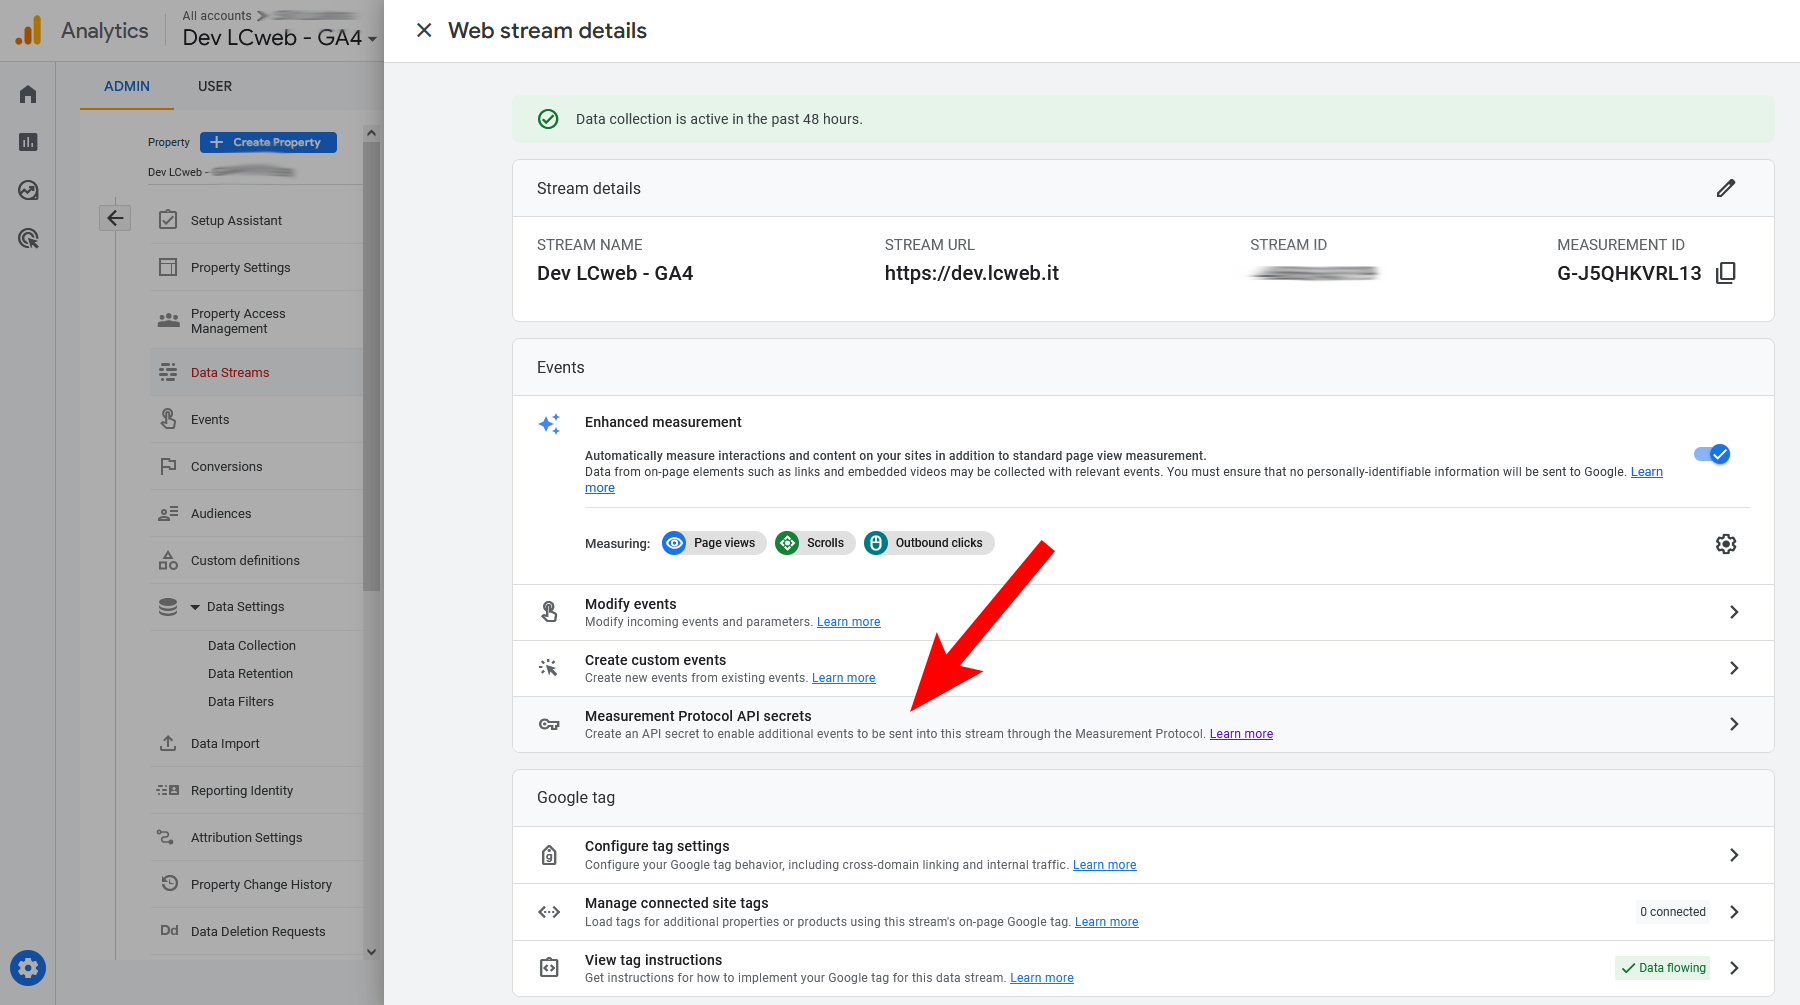
In the same screen where you get the "Measurement ID", click on the "Measurement Protocol API secrets" menu, create a new key and use it - Google Tag Manager ID
- Follow the Google guide to get it
Once saved, PrivateContent will setup the "pc_user_id" tag to start the User ID tracking and create specific events.
Remember to include Google Analytics and Google Tag Manager codes into the website (check the related plugin option or do it through another plugin).
Final step: Google Tag Manager must track the "pc_user_id" parameter and associate it to the User ID tracking.
Please follow the video to know how to do it:
In the previous chapters you learnt the PrivateContent systems, but they are only the tip of the iceberg.
The real strength of the plugin is in its suite: bringing dozens of systems to suit any project.
|
|
User Data add-on Collect additional user data and push PrivateContent forms to the limit. Create and use unlimited, conditional and combo fields to record customers data! |
Check it |
|
|
Mail Actions add-on Manages PrivateContent e-mail operations: e-mail address validation, password retrieval, Mailpoet + Mailchimp sync and much more. Finally a true e-mail marketing campaign engine to run your newsletters! |
Check it |
|
|
Files Manager add-on The best private files manager for your WordPress membership website. Supports any file type, offers unlimited upload fields and several awesome file views! |
Check it |
|
|
Premium Plans add-on Turn PrivateContent into a true premium membership platform. Take advantage of WooCommerce systems to handle payments and time-limited subscriptions! |
Check it |
|
|
Data Bridge add-on Connect PrivateContent with external systems: manage or send users data through webhooks. Enjoy the native Zapier integration or use user actions to update their data |
Check it |
|
|
User Activities add-on A powerful and user-friendly solution to track PrivateContent users interaction on your website. Includes also a scheduled e-mail report engine! |
Check it |
PrivateContent is a dev-oriented plugin, ready to be extended and tweaked in any way you need.
Check the Public API documentation and knowledge base to understand how.
The plugin is 100% multilanguage for both front and back ends. If a translation of your language has been created, WordPress will automatically switch between languages. Plus it is compatible with WPML and Polylang dynamic elements translations!
How to create a translation
If you have WPML + String Translation add-on or Polylang, you can simply scan the plugin and translate strings via its UI.
Otherwise: go in the plugin folder, you'll find two folders called "languages" and "lang_admin".
Inside you'll find the default.pot file. It contains english strings to be translated.
If you want to create or customize your language translation, follow these steps:
- Open the default.pot file with POedit
- Edit the catalog by inserting your data and setting translation's language
- Save the file with your language's i18n identifier and "pc_ml-" prefix (the italian example is pc_ml-it_IT)
- Go to the plugin folder ".. wp-content/plugins/private-content/languages" or ".. wp-content/plugins/private-content/lang_admin" and paste and paste resulting .PO and .MO files
If you create new translations, please contact me at [email protected] sending your .PO and .MO files.
Otherwise they will be lost in next updates. Thanks!
Please note HTML5 form validations (the red ones appearing submitting forms) are automatically generated by your browser and follow its language
Existing Localizations (frontend):
| Afrikaans (South Africa) | To be completed |
|---|---|
| Argentine | To be completed |
| Brazilian | To be completed |
| Croatian | To be completed |
| Czech | To be completed |
| Danish | To be completed |
| Dutch | 100% translated |
| Estonian | To be completed |
| Finnish | To be completed |
| French | 100% translated |
| Georgian | To be completed |
| German | To be completed |
| Greek | To be completed |
| Italian | 100% translated |
| Norwegian | To be completed |
| Persian (Iran) | To be completed |
| Polish | To be completed |
| Romanian | To be completed |
| Russian | To be completed |
| Slovak | To be completed |
| Spanish | To be completed |
| Swedish | To be completed |
| Turkish | To be completed |
This chapter is addressed to users having to deal with GDPR european law and will briefly give you informations about users data management to adhere with european standards:
- User data are kept uniquely on your server, in a custom database table (and data is mirrored on WP users table if you are using WP user sync system)
- Passwords are stored using the WordPress hashing system and can't be retrieved nor viewed by anyone
- Users can totally remove their data from the website using the related box (check shortcodes section)
- The only cookie used is named "pc_user" and is used to keep user logged in
- There are other operative cookies you should mark as mandatory in "cookie consent" forms: "pc_remember_login", "pc_session_token" and "pc_last_restricted_page"