Before going through documentation chapters, thanks for purchasing PrivateContent Premium Plans add-on and trusting LCweb!
Need further help?
Need a customization?
This add-on is based on WooCommerce, be sure to have it installed and enabled first!
On first plugin's activation, it must be activated in order to work.
Head to the LCweb Dashboard page: it contains the summary of all LCweb products with useful links and their validation forms.

LCweb Shop License:
Your license is automatically registered into the LCweb database, you only need to
- go to your licenses dashboard and select the section your product belongs to (if you own only one product, you will be automatically moved)
- Scroll down until you find the license you want to use for the website and click on the pencil button
- Insert the website domain and save. The system will give you the activation token
- Copy and paste it into the LCweb dashboard, on your website
Envato Marketplace License:
In this case you need to manually register on the LCweb Licenses Hub
- Go to the LCweb Licenses Hub and, if you never registered, do it. You will have to validate your e-mail and use a login token in order to enter.
- Once you are in, select the section your product belongs to (if you own only one product, you will be automatically moved)
- Scroll down until you find the product and click on the PLUS button. A form will prompt you to enter the Envato purchase code (how to get it?) and the website domain
- Once saved, the system will give you the activation token
- Copy and paste it into the LCweb dashboard, on your website
In case you have an intranet or localhost website (or your server is blocking external communications against the LCweb endpoint) you can use the offline activation.
Click on the related link (in the LCweb Dashboard) and fill in the form with the requested data: the offline token can be found following the steps listed above.
The very first step to use the add-on is to create at least one subscription plan. Premium Plans supports:
- Time limited/unlimited
- Free/pay
- one-time/recurring payment
subscriptions.
Please note to create automatic recurring payments you must have WooCommerce Subscription plugin installed. Otherwise time-limited plans will simply expire and users will be eventually prompted to pay again to renew their subscription.
PrivateContent plans can be managed exclusively through a registration form.
They are hidden from your shop since cannot be directly purchased.
WooCommerce Subscription plugin (for recurring payments) requires a valid WordPress user to work. Because of this you must enable the WP User Sync system and require it on registration
- Duration Extensions
-
Simple Products supports also duration extensions. While these are totally optional, are a good way to earn more while offering a longer subscription at a special price
- Plan tags
-
Also this feature is totally optional, but is a great way to highlight your plans in front forms
- Plans visibility in registration forms
-
To enable and use the add-on you must have at least one plan that can be chosen in frontend forms
- Plans visibility in renewal/plan-change form
-
You may choose to exclude certain plans from renewal/plan-change forms, keeping them only for the registration phase
- Avoid renewal?
-
You may avoid renewal on specific plans. Once users subscription ends, user won't be able to re-enter privateContent
- Selective description's text
-
You might need to write different texts for registration or plan's change/renew forms. This is possible wrapping texts with two shortcodes:
- [pcpp-reg-form-txt].. contents ..[/pcpp-reg-form-txt] to set registration form texts
- [pcpp-chg-form-txt].. contents ..[/pcpp-chg-form-txt] to set plan's change/renew form texts
- Product pages
-
PrivateContent plans are totally removed from your webite.
They don't have an URL nor can be listed, are uniquely used by PrivateContent forms
Once you have plans, you are ready to enable the add-on integration into the PrivateContent universe.
Go in the PrivateContent settings page and you will notice a new tab (Premium Plans).
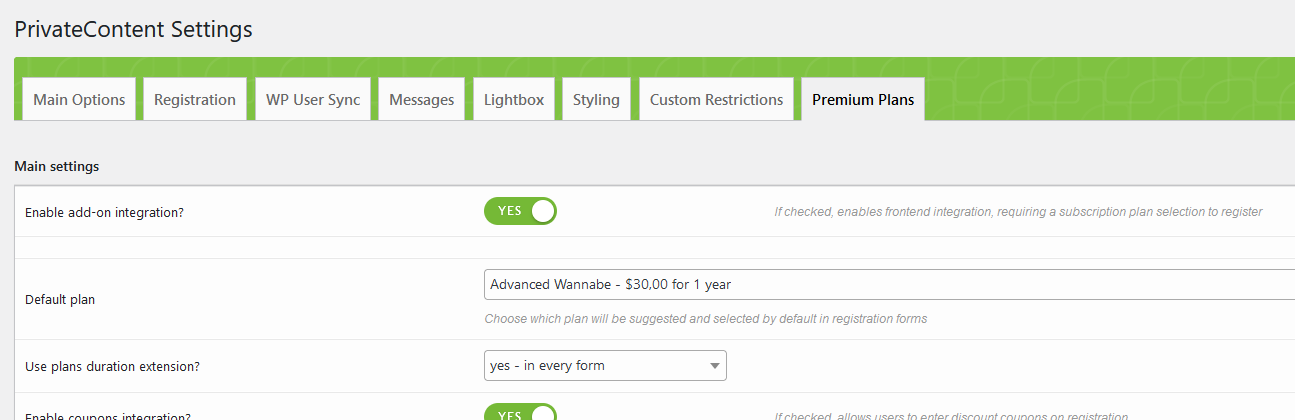
The very first option toggles the add-on integration. Having it is enabled means users must choose a plan to register and registered users access will be managed (check the next chapter to know more about this).
Please check also these settings section notes:
- Red options legend
-
Please set carefully the options having red legends aside: they could prevent website pages access!
- Trial period
-
The trial period skips user's payment until it is expired. Afterwards he will have to pay to access.
It applies to any plan and is stored individually for every user: increasing the trial period, it will be applied only to future users - Subscription plan change modes
-
Please check the related following chapter in this documentation to know more
- Renew order page
-
It must be specified to allow manual subscription renewals. Remember it must be a brand new page, since it won't be accessible by default
- Billing fields association
-
Is based on additional fields registered in the PrivateContent engine.
You can use User Data add-on or create them through API.Specially the state and country fields can be created in a couple of clicks through User Data add-on v3.
A proper association during the registration phase is strongly suggested for recurring payments, by WooCommerce Subscription plugin.
- Existing users association
-
Bulk applies a plan to existing users not associated with the add-on. Remember you can do it individually in "edit user" page.
Be careful: newly associated users will be placed in "unpaid" status and need to pay to login in PrivateContent again. - Custom suggested plan
-
You can also change default suggested plan in frontend plans. Use pcpp_plan parameter in URL + plan ID
For example: https://mysite.com/mypage/?pcpp_plan=10
By default existing users aren't involved in add-on checks. This means they will still be able to login.
Is possible to associate a plan globally in Premium Plans add-on settings or individually editing an user.
Once associated with a plan, users will require an active subscription to be able to login. Statuses are
| Expired | Unpaid | Trial | Active |
|---|
Then only users with active or trial status can login into PrivateContent.
Assigned plan, status and expiration date can be changed in "edit user" page.
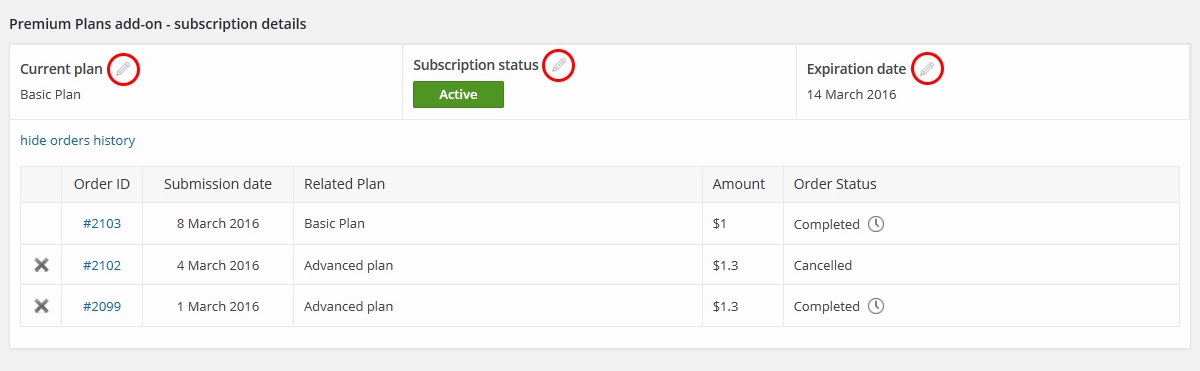
Here you can also check user orders history and eventually delete past orders.
Some useful notes about manual status change:
- If user has got unpaid status and you manually set it as expired or active - associated order will be set as cancelled
- Unpaid status can only be set if user's last order hasn't been paid
However status depends also from user's active order status (active order is the first one shown in table, in previous image).
This means:
- if you set it as paid - user status will be set as active
- if you set it as cancelled - user status will be set as expired
- in any other case - user status will be set as unpaid
Already existing users can be associated to plans directly in "edit user" page, individully.
Otherwise in Settings page there's a little wizard to bulk assign a plan to any not-associated user.
Be careful: for each new association a new order will be set up and users will be placed in unpaid status
Then, they have to pay for their subscription in order to keep logging into PrivateContent.
By default users are not allowed to change nor extend their subscription. You can allow this by placing the [pcpp-change-plan] shortcode (or using the related builder block) in your website.
The form will only allow plan's duration extension or also a complete plan change depending on what you chose in the settings.
(Optional) discounts are precisely calculated basing on the subscription's date, paid amount and remaining subscription time.
Clearly this section doesn't apply to recurring payment subscriptions
Premium Plans add-on has got an automated subscription's renewal system.
This means as soon as user has got the expired status, in the login message they will be able to create a new order and pay for it, without delays.
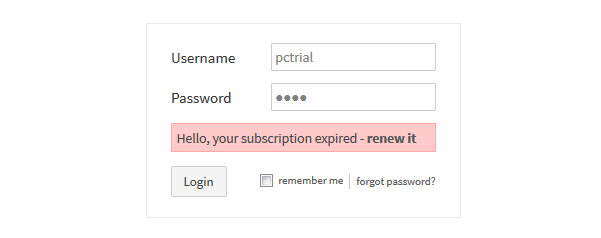
Then, by default, renew will be performed on same plan.
However, in settings, you can change this behavior and allow plan's change.
- create a brand new wordpress page
- compose it as you prefer and finally use [pcpp-change-plan] shortcode to show plan's change form
- select that page in related settings option

Owning Mail Actions add-on you can also enable the subscription expiration notification directly in Mail Actions settings
To use these systems you must have also Mail Actions add-on installed
Go into Mail Actions add-on settings to find a new tab called "Premium Plans add-on".
On top it shows the enpoint URL to be used in a cronjob, to be set in your hosting panel. (what is a cronjob?)
[lbimg src="img/email_notifs.png" alt="e-mail notifications"]
Then there will be sections related to available notifications.
Each one can be enabled/disabled.
NB: reminders/notifications will be sent only ONCE to every user.
Alerts the user as soon as its suscription expires.
Is possible to insert a direct "renew plan" link in the e-mail.
You set how many forewarning days to count and the system will inform users having an active trial period about the imminent deadline
Creating plans you will be able to set specific restrictions requiring them, or also define further restrictions on an already restricted page.
Each category-selection dropdown used to specify some restriction will now have plans listed.
Let's take this restriction's wizard, in a normal WP page editor:
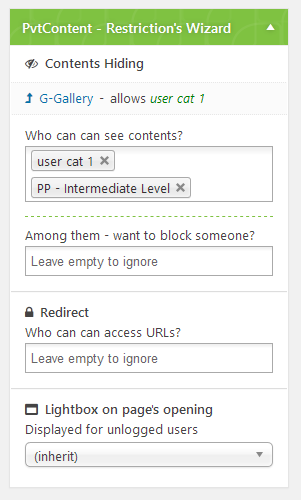
This page has been restricted to be visible by "User Cat 1" users OR belonging to "intermediate level" plan.
This is valid across any category-based restriction system and using pc_user_check() API function.
Then is automatically integrated in categories, pages, posts, menus and widget restriction wizards. Obviously also in privateContent shortcode.
This add-on is natively integrated with with WordPress Block Editor (Gutenberg), Visual Composer, Elementor and Divi Builder.
Using them, you can skip the standard shortcode wizard and use the related PrivateContent tool.
For any other builder or using the old WordPress editor just open the PrivateContent shortcode wizard and select one of the options with the "PCPP" prefix from the shortcode's dropdown list.
Select the view you want to show and click on "insert".
Displays the user plan's extension / change / renewal form.
[pcpp-change-plan]Prints currently logged user's plan
[pcpp-user-plan]Prints currently logged user's plan expiration date.
If user is in trial period, the shortcode shows date/countdown related to the trial period expiration
Printing the precise date
The optional date_format parameter can be used to specify a different date format from your website's global one.
You must use PHP syntax.
[pcpp-subscr-expir type="date" date_format="j F Y"]Printing as countdown
This format will show how much time rests until subscription's expidation (eg. 2 days, 1 week, 1 year, etc).
[pcpp-subscr-expir type="countdown"]Outputs a table containing a summary of currently logged user's orders history linked to the subscription.
The optional date_format parameter can be used to specify a different date format from your website's global one.
You must use PHP syntax.
It also displays a link to order invoices by using the WooCommerce PDF Invoices & Packing Slips plugin!
[pcpp-user-orders-history date_format="j F Y"] Displays an useful block letting visitors to choose a plan without outputting a whole registration form.
It may redirect to a target page or trigger a lightbox (choose it in settings).
[pcpp-plan-chooser focused_plan="15"]Selectively show/hide contents basing on the suscription status
To show contents only for users in trial period
[pcpp-is-trial]... contents ...[/pcpp-is-trial]To show contents only for users not in trial period
[pcpp-is-not-trial]... contents ...[/pcpp-is-not-trial]If you website doesn't have constant traffic, the add-on has got a dedicated endpoint you can call to be sure expirations and renewals are managed at the right time.
To do so, add a server cron-task pointing to: (https://yourwebsite.com) /wp-json/pcpp/check_users_subscr_status
The plugin is 100% multilanguage for both front and back ends. If a translation of your language has been created, WordPress will automatically switch between languages.
Plus it is compatible with WPMLand Polylang!
How to create a translation
If you have WPML + String Translation add-on or Polylang, you can simply scan the plugin and translate strings via its UI.
Otherwise: go in the plugin folder, you'll find a folder called "languages".
Inside you'll find the default.pot file. It contains english strings to be translated.
If you want to create or customize your language translation, follow these steps:
- Open the default.pot file with POedit
- Edit the catalog by inserting your data and setting translation's language
- Save the file with your language's i18n identifier and "pcpp_ml-" prefix (the italian example is pcpp_ml-it_IT)
- Go to the plugin folder ".. wp-content/plugins/private-content-premium-plans/languages" and paste and paste resulting .PO and .MO files
If you create new translations, please contact me at [email protected] sending your .PO and .MO files.
Otherwise they will be lost in next updates. Thanks!