Before going through documentation chapters, thanks for purchasing PrivateContent Mail Actions add-on and trusting LCweb!
Need further help?
Need a customization?
On first plugin's activation, it must be activated in order to work.
Head to the LCweb Dashboard page: it contains the summary of all LCweb products with useful links and their validation forms.

LCweb Shop License:
Your license is automatically registered into the LCweb database, you only need to
- go to your licenses dashboard and select the section your product belongs to (if you own only one product, you will be automatically moved)
- Scroll down until you find the license you want to use for the website and click on the pencil button
- Insert the website domain and save. The system will give you the activation token
- Copy and paste it into the LCweb dashboard, on your website
Envato Marketplace License:
In this case you need to manually register on the LCweb Licenses Hub
- Go to the LCweb Licenses Hub and, if you never registered, do it. You will have to validate your e-mail and use a login token in order to enter.
- Once you are in, select the section your product belongs to (if you own only one product, you will be automatically moved)
- Scroll down until you find the product and click on the PLUS button. A form will prompt you to enter the Envato purchase code (how to get it?) and the website domain
- Once saved, the system will give you the activation token
- Copy and paste it into the LCweb dashboard, on your website
In case you have an intranet or localhost website (or your server is blocking external communications against the LCweb endpoint) you can use the offline activation.
Click on the related link (in the LCweb Dashboard) and fill in the form with the requested data: the offline token can be found following the steps listed above.
Once activated, you will see a new item in the WordPress admin menu

Click on "Mail Actions" to access the add-on configuration panel.
The very first thing to do in order to use it, is to setup the e-mail configuration
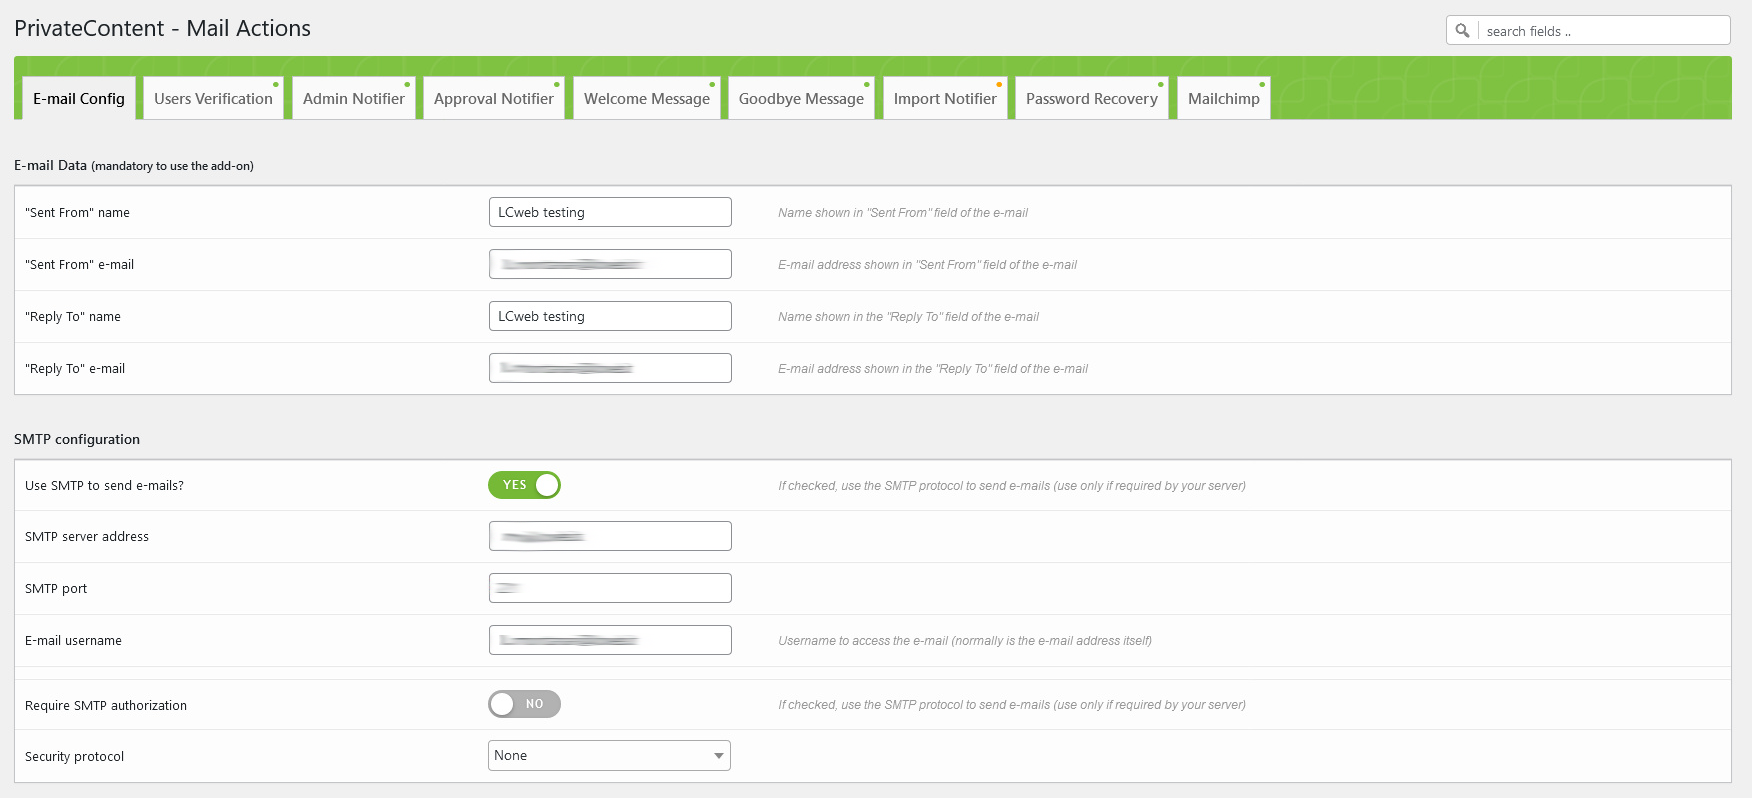
- SMTP could help against false-positive spam filters run by worldwide e-mail inboxes
- Facing troubles using the "test e-mail" tool, consult your e-mail address guidelines about e-mails outgoing. Is strongly suggested to run the tool to be sure the add-on is able to send e-mails
- "Outgoing bulk e-mails limit" is an essential section, mainly addressed to E-mail Campaign system.
More infos in the related chapter
E-mail titles and texts could contain placeholders to show dynamic data.
The allowed variables for each module are specified on top of each e-mail builder block.
You can also use PrivateContent User Data add-on shortcode to use custom users data in e-mails
- Using "visual" mode, the WordPress editor will care about the HTML code that will be used as e-mail contents
- Using "text" mode allows a more advanced approach, tailoring the HTML contents code. Is also the right choice if you want to use plain text
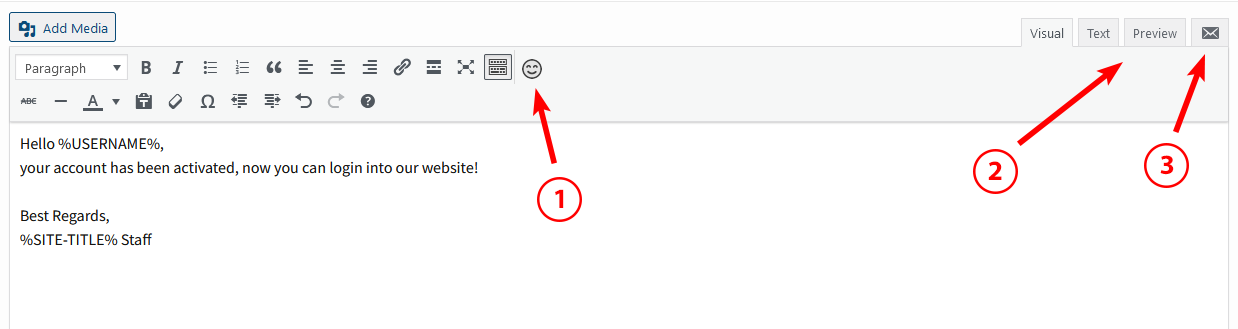
These editors have also special functions:
- An emoji picker to add them in the e-mail text
- Clicking the "preview" tab you will see in real time how the e-mail will look like. It considers also the e-mail template you chose to use.
- Clicking the e-mail icon you can send a test e-mail using the real-time e-mail contents. It considers also the e-mail template you chose to use.
Is suggested to have a real-world inbox feedback
Keep in mind every inbox system (eg. gmail, Windows Mail, mobile apps) have their own filters about HTML e-mail. Is impossible to have the guarantee everything will be perfectly rendered everywhere.
However there are good practices that could be followed: an easy way to create a valid structure is to take advantage of the MailChimp e-mails builder and use its code
The add-on supports e-mail templates. This means a fixed code will be used as base, while its contents will be replaced.
Let's make practical example: assume you created a basic template like this
<!DOCTYPE html PUBLIC "-//W3C//DTD XHTML 1.0 Strict//EN" "http://www.w3.org/TR/xhtml1/DTD/xhtml1-strict.dtd">
<html xmlns="http://www.w3.org/1999/xhtml">
<head>
<meta http-equiv="Content-Type" content="text/html; charset=UTF-8">
<meta name="viewport" content="width=device-width, initial-scale=1.0">
<title>My site</title>
</head>
<body>
<div><h1>My Site Title</h1></div>
<div>%CONTENT%</div>
<footer>My site © %YEAR%</footer>
</body>
</html>
assume also to have attachedit to the "user verification" and "password recovery" systems.
It will be used as base and the %CONTENT% placeholder will be replaced each time with specific "user verification" and "password recovery" e-mail texts.
You can easily understand how powerful it can be, keeping all HTML and CSS codes in one place while only textual contents can be used for the add-on systems.
You can also use complex templates taken from external services like Mailchimp.
This powerful tool is meant to safely send (and schedule) e-mails to multiple receivers, even if your server has a lower hourly/daily/monthly e-mail limit.
How? Simply splitting receivers into chunks to be managed hour after hour.
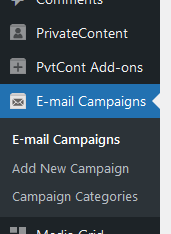
A new WordPress admin menu has been created, right under the "PvtCont Add-ons" one.
Follow the following sub-chapters to know how to use it!
This is the primary parameter used by the campaigns engine: every server has got an hourly/daily/monthly outgoing e-mail limit.
It might vary a lot (eg. 100 to 10.000+), because of this is essential to know the exact value.
Please check in your hosting plan description or ask directly to your hoster.
Reaching the limit, in most cases the server won't return any error and e-mails would be erroneously marked as sent.
Once you defined the right limit, set the value in the related Mail Actions settings field.
Is strongly suggested to use a slightly lower value than your hourly/daily/monthly limit, to have a decent number of spare outgoing e-mails to use for other systems and your personal use.
While totally optional, you might need to categorize your campaigns (eg. to group them)
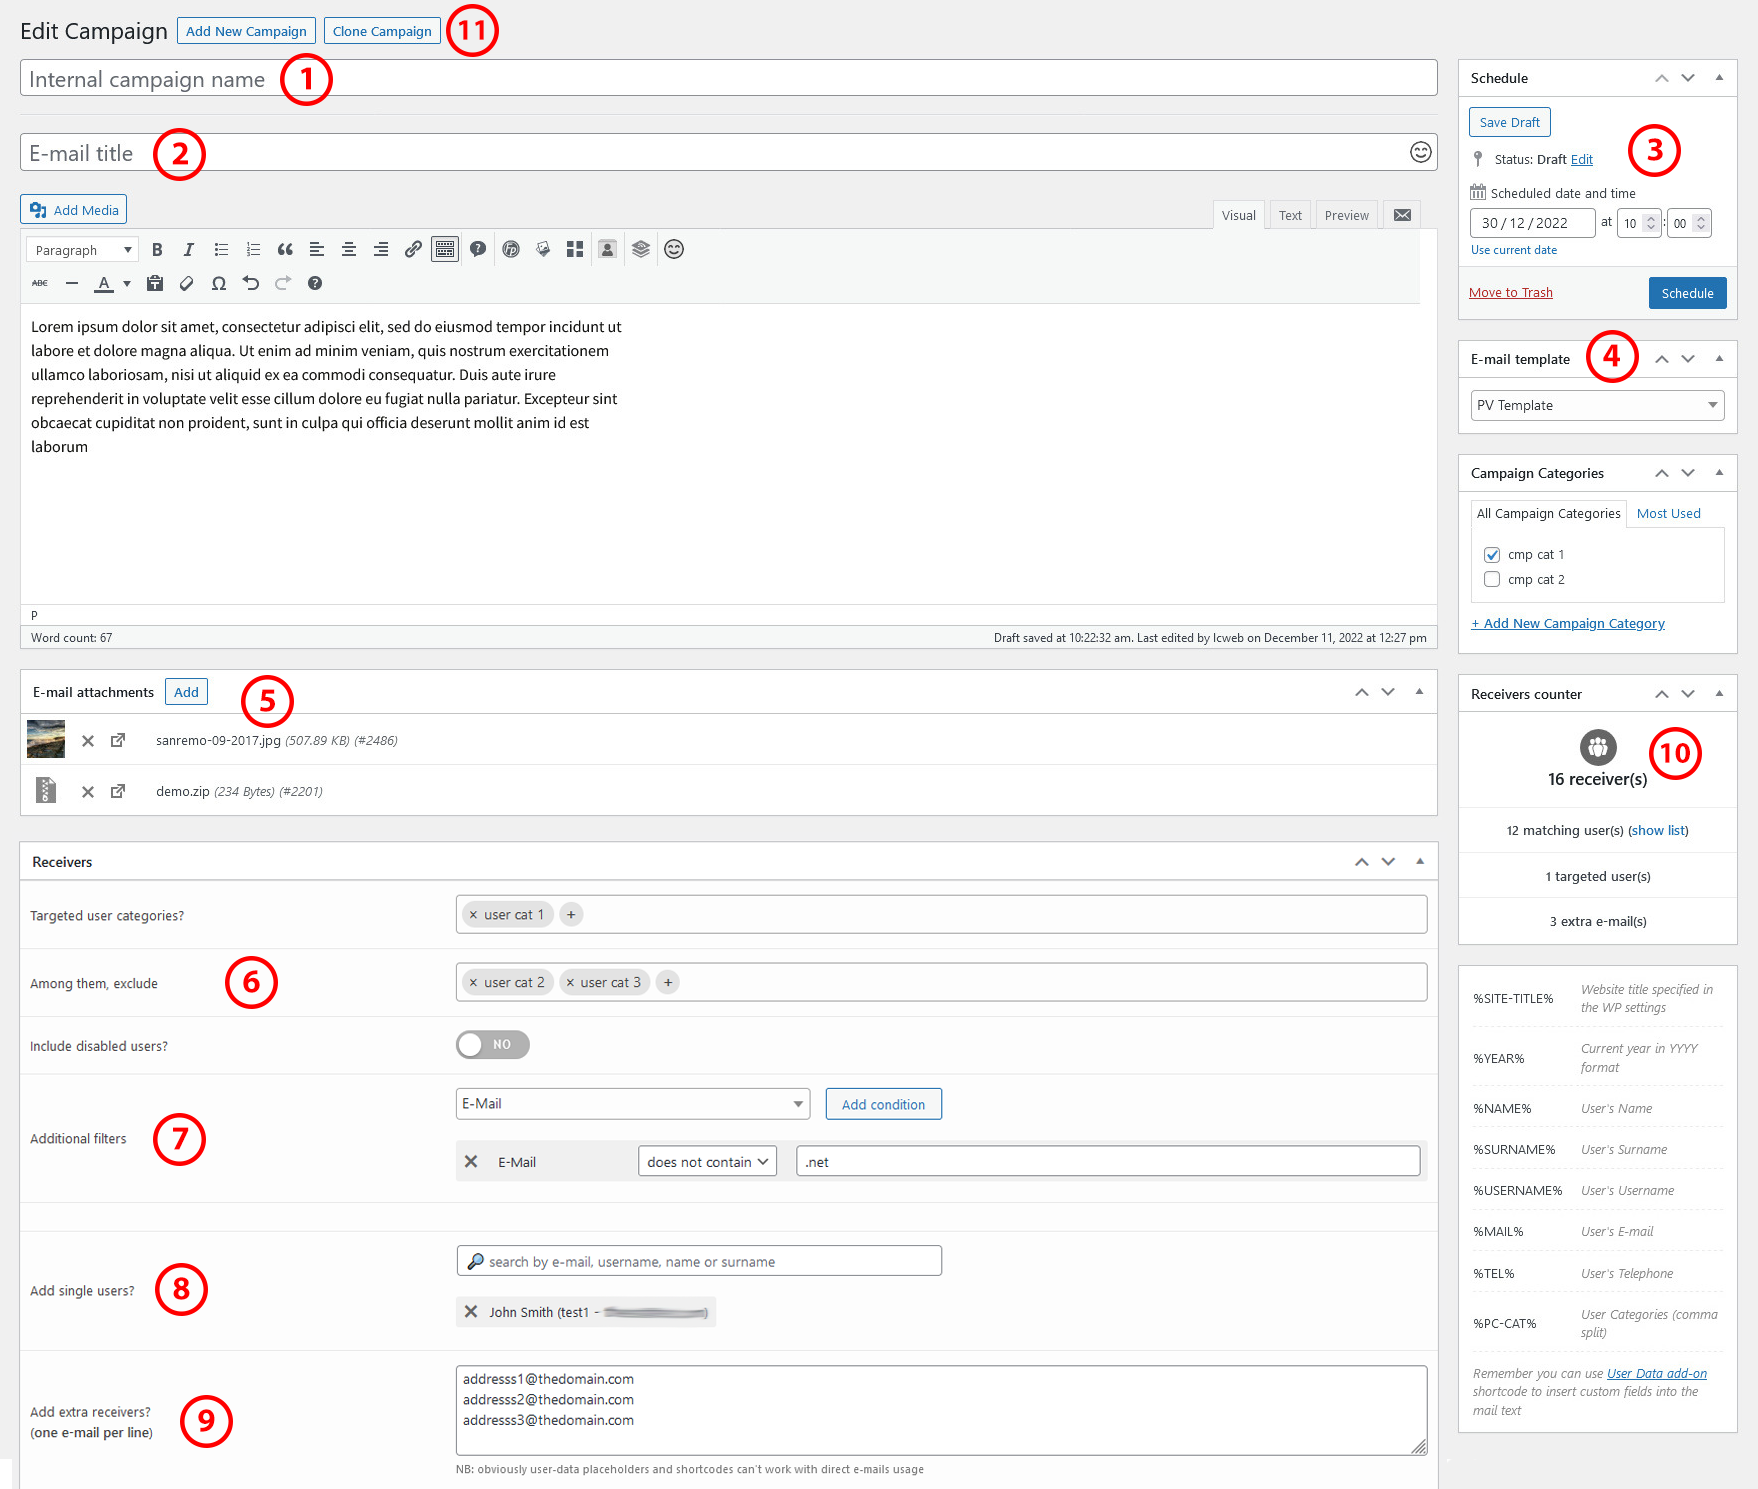
- Campaign title visible (and searchable) only from the admin interface
- The e-mail title
- Campaign status and schedule box. Campaigns are processed by the WordPress cron-task egine every 5 minutes.
Because of this, campaign schedue date must be always at least 5 minutes in the future. - The template you might want to use for the e-mail
- Eventual e-mail attachments taken from WP media library. Worth suggesting to avoid using huge files
- Fields involved for PrivateContent users targeting: include/exclude user categories and eventually include disabled users
- This section is meant to filter involved PrivateContent users. You can mix various parameters to target users in a super-precise way
- You might need to send the e-mail to single users or add extra PrivateContent users to previously targeted ones
- You might need to send the e-mail extra addresses. Insert them one per row.
Obviously e-mail placeholders (or User Data add-on shortcodes) will retun an empty string for them. - Filling the receivers form fields, you will see the "receivers box" reloading to give you a real-time preview of how many (and which one) users will be involved in this campaign. At least one receiver is required.
- The clone button: creting a new campaign draft with the same contents and configuration
- Campaign configuration is locked once it started to be processed.
- The definitive receivers list is stored as soon as the campaign starts.
As written, campaigns are processed every 5 minutes by the WordPress cron-task engine.
It is triggered every time the website opens, therefore, if your website doesn't have constant visitors, you must setup a server cron-job opening whatever website page on that interval (please ask your hoster if you are not able to do this).
If you need to immediately process pending campaigns, add this parameter to any website page's URL: pcma_process_campaigns
One of the simplest and most effective ways to verify users is to send them an e-mail containing a unique link, validating the e-mail address.
Enabling this system, e-mail will be mandatory in registration forms (be sure you added the e-mail field into them!) and registered users will be put in pending status.
By default, clicking the e-mail link, they will be automaticallu enabled. However there's an option to ignore the user status and only mark them as validated in the users list page.
- Landing Page
-
If called directly, the landing page will redirect to the homepage. Then it MUST be a newly created page.
It should not be changed once the system is active or the links sent via mail won't work! - Users status
-
Remember that users must be registered with pending status to trigger this system. Obviously an active user can't be validated again
- Manual e-mail sending
-
Is also posssible to manually send the verification e-mail. Directly from Mail Actions settings for user group or on "edit user" page for individuals. Please note that user will be able to verify themselves only through the URL contained in last e-mail received
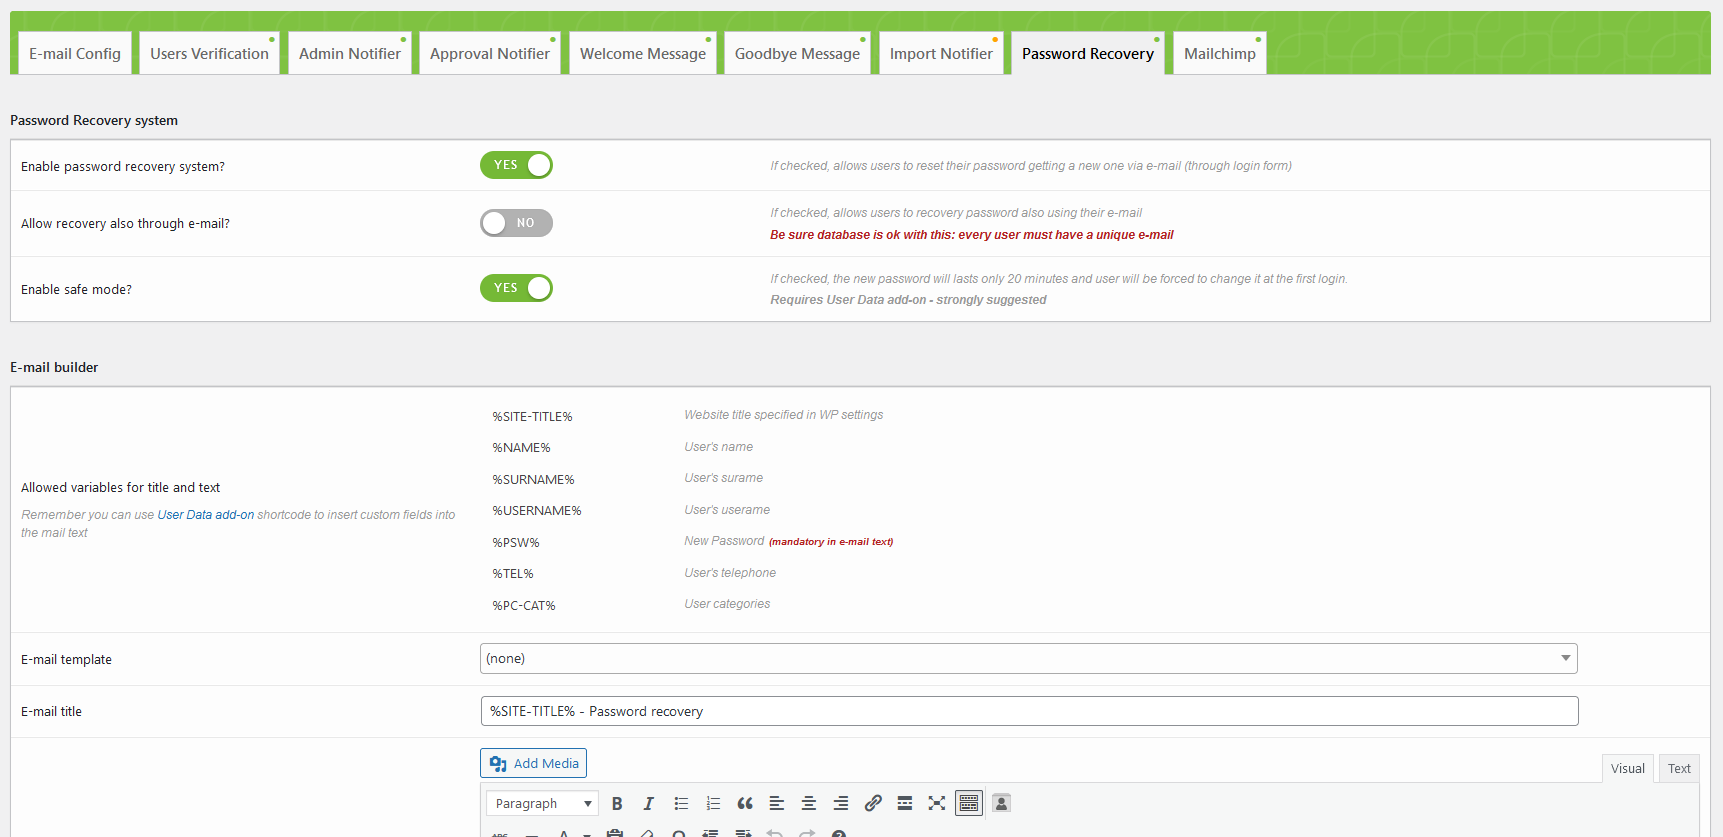
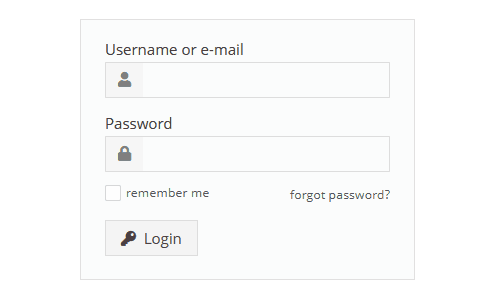
Essential system helping users having lost their password
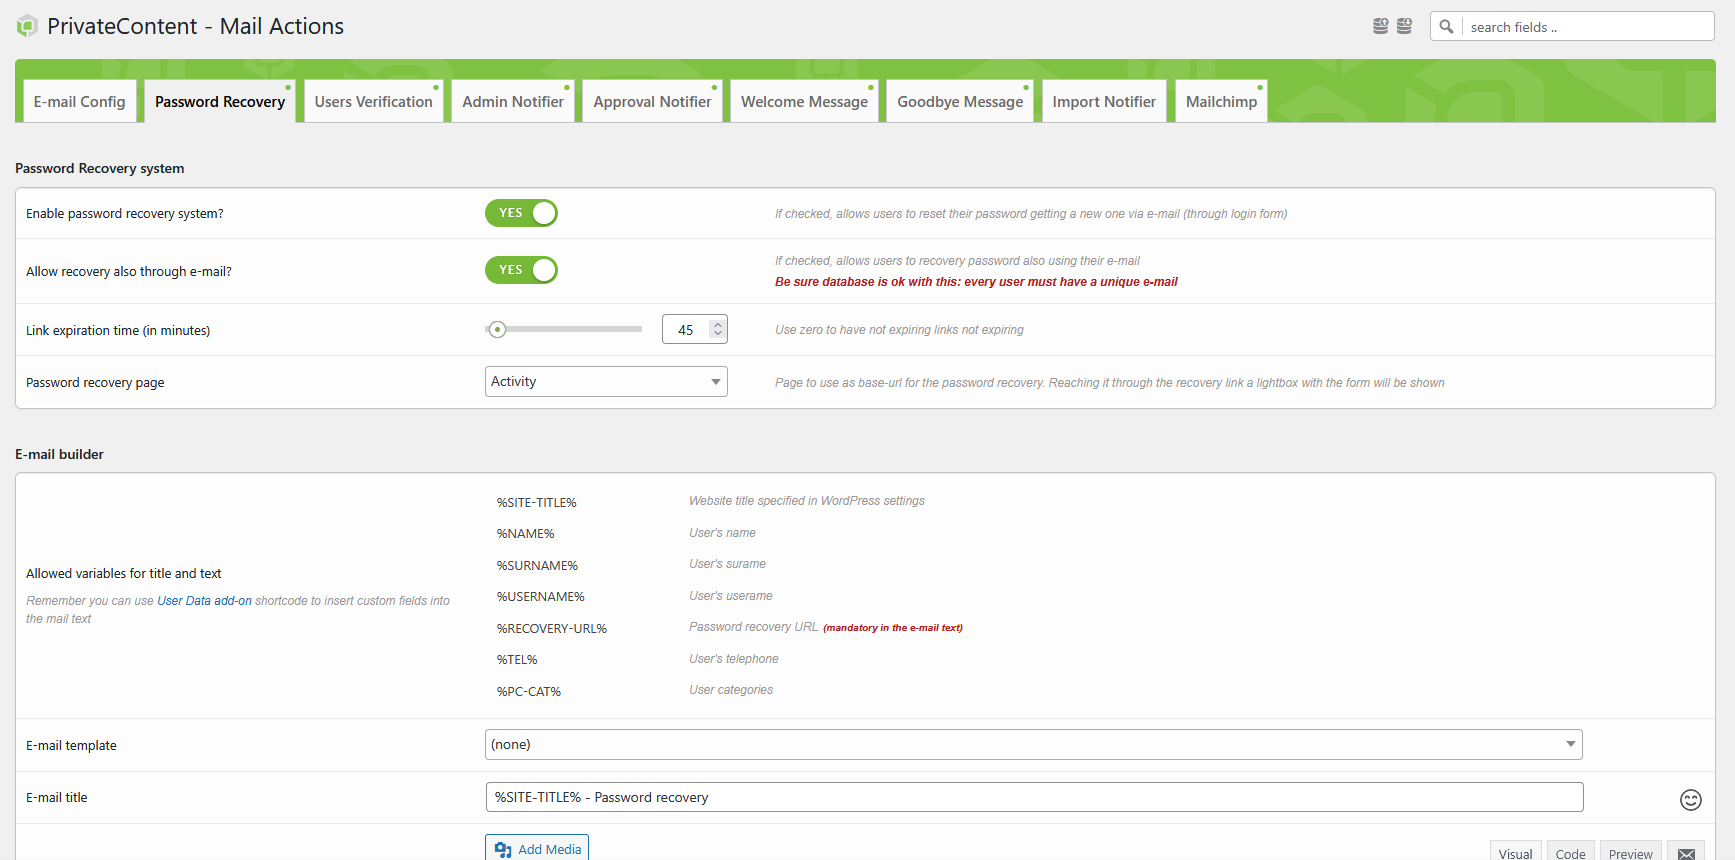
Enabling it, a new interactive text will be appended to login forms
The system will send an e-mail containing a link with a crypted parameter, bringing back to the website.
Though that parameter the add-on recognizes the user and shows up the lightbox with the password change form within.
This option is available only if "Import Notifier" system is enabled in Mail Actions add-on settings
Normally you would have to define a "password" column in the import CSV file.
This is great if you want to set specific values or to import old existing ones.
However you might not know those values and set a common one for dozens/hundreds/thousands of users is surely not good.
Now you can simply switch on the related option in the Import User form and get rid of the password column.
Two important notes:
- The import CSV file MUST NOT have the password column
- Remember to insert the %PSW% placeholder in the notifier e-mail, otherwise will be impossible to know the user password and you will need to reset it manually!
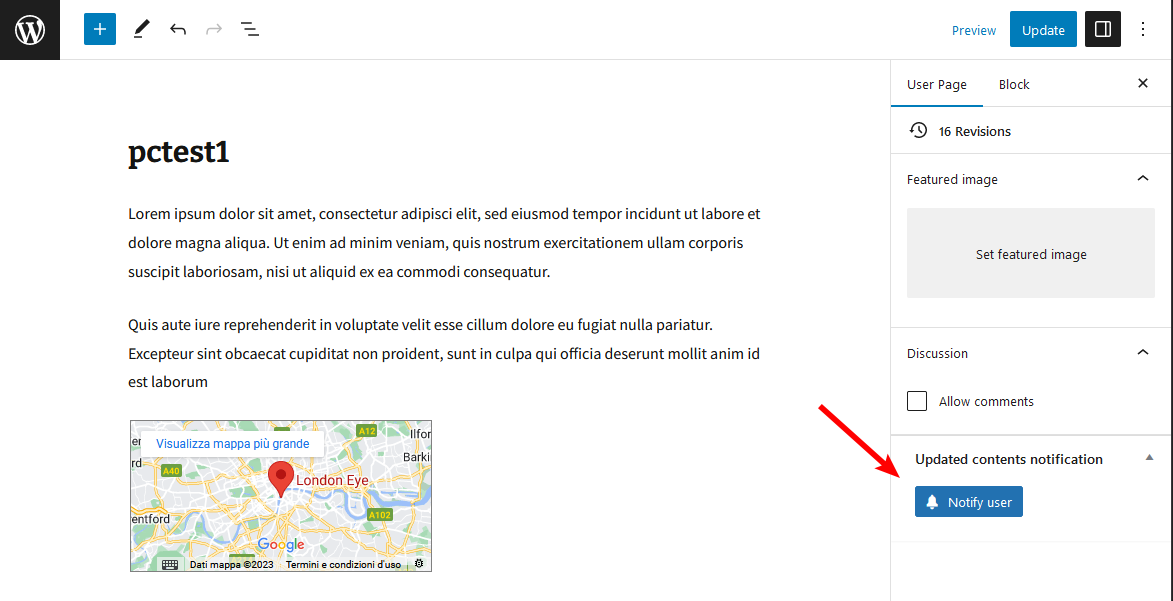
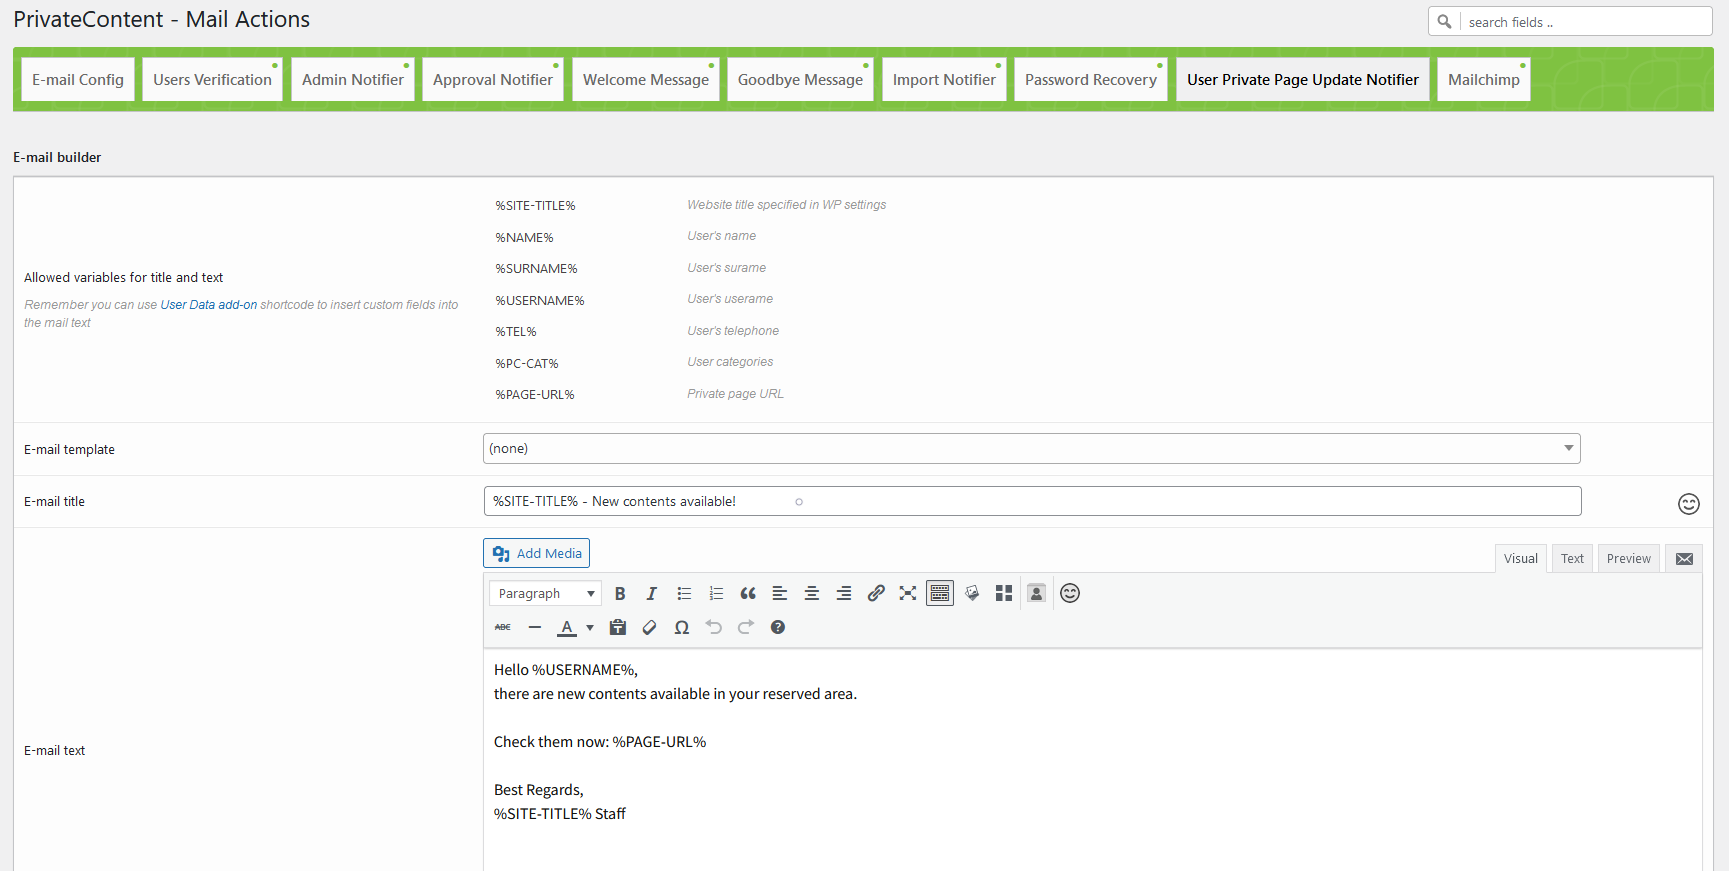 This system is addressed to customers needing a way to easily get in touch every time a content is updated for a single user.
As first, be sure to have saved at least once the e-mail texts, in the Mail Actions add-on settings page.
Then, going in the WordPress editor (classic or Gutenberg one) of the user reserved page (be sure the user has got the e-mail!) and you will see a the notification button to be clicked to send out the e-mail.
This add-on section is available only if MailPoet plugin is enabled

Once enabled, the add-on will automatically register PrivateContent users into Mailpoet and (eventually) create MailPoet lists from PrivateContent categories. The MailPoet sync status is reported in the privateContent users list and, with details, in the user dashboard.
Unsubscribed Users - Webhook
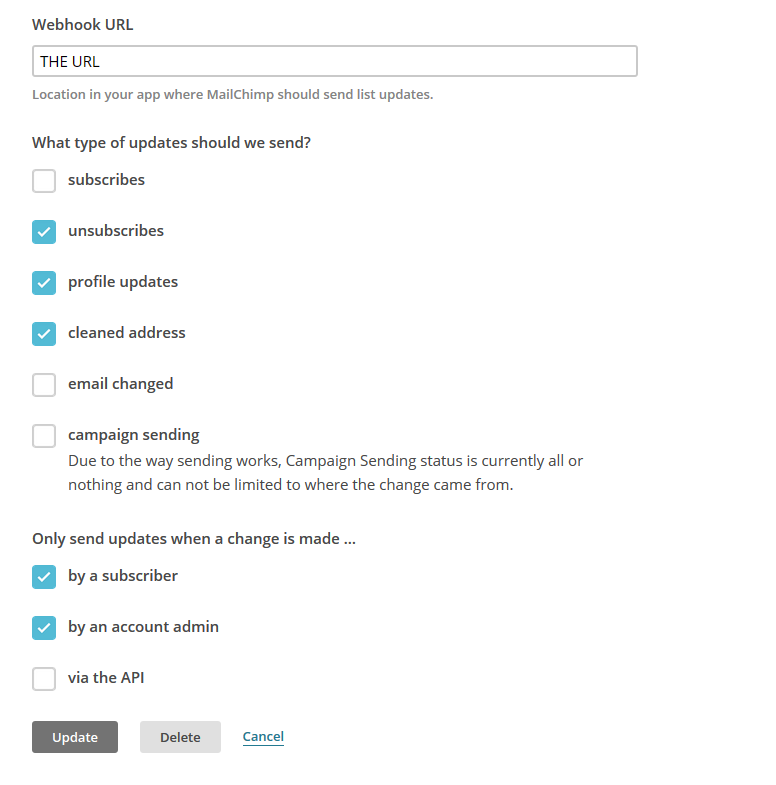
The add-on has got an endpoint URL to track mailchimp subscribed users.
The URL to use is in Mail Action settings, show once you set up the API key.
There you'll find a link guiding you on Mailchimp's page where to create webhooks.
Create a webhook with these exact options
Notes:
- Bulk Actions
-
The sync uses Mailchimp batches to avoid excessive server usage. These actions (eg. manual sync) aren't immediate, then expect a little delay (around 5 minutes) to see changes in Mailchimp
- Users Management
-
Remember that sync is performed from PvtContent to Mailchimp, then any change performed in Mailchimp won't be reflected
- Users Unsubscription
-
The above note doesn't apply to useres deletion or subscription if you setup webhook. Unsubscribed/deleted useres will be marked as "no sync" in pvtContent
- User Categories
-
Once you performed the first manual sync, a list will be created, containing user categories. this list MUST NOT be touched, to avoid sync troubles
The add-on is 100% multilanguage for both front and back ends. If a translation of your language has been created, WordPress will automatically switch between languages.
Plus it is compatible with WPML and Polylang!
How to create a translation
If you have WPML + String Translation add-on or Polylang, you can simply scan the plugin and translate strings via its UI.
Otherwise: go in the plugin folder, you'll find a two folders called "languages" and "lang_admin".
Inside you'll find the default.pot file. It contains english strings to be translated.
If you want to create or customize your language translation, follow these steps:
- Open the default.pot file with POedit
- Edit the catalog by inserting your data and setting translation's language
- Save the file with your language's i18n identifier and "pcma_ml-" prefix (the italian example is pcma_ml-it_IT)
- Go to the plugin folder ".. wp-content/plugins/private-content-mail-actions/languages" and paste resulting .PO and .MO files
If you create new translations, please contact me at [email protected] sending your .PO and .MO files.
Otherwise they will be lost in next updates. Thanks!