Before going through documentation chapters, thanks for purchasing PrivateContent Files Manager add-on and trusting LCweb!
Need further help?
Need a customization?
On first plugin's activation, it must be activated in order to work.
Head to the LCweb Dashboard page: it contains the summary of all LCweb products with useful links and their validation forms.

LCweb Shop License:
Your license is automatically registered into the LCweb database, you only need to
- go to your licenses dashboard and select the section your product belongs to (if you own only one product, you will be automatically moved)
- Scroll down until you find the license you want to use for the website and click on the pencil button
- Insert the website domain and save. The system will give you the activation token
- Copy and paste it into the LCweb dashboard, on your website
Envato Marketplace License:
In this case you need to manually register on the LCweb Licenses Hub
- Go to the LCweb Licenses Hub and, if you never registered, do it. You will have to validate your e-mail and use a login token in order to enter.
- Once you are in, select the section your product belongs to (if you own only one product, you will be automatically moved)
- Scroll down until you find the product and click on the PLUS button. A form will prompt you to enter the Envato purchase code (how to get it?) and the website domain
- Once saved, the system will give you the activation token
- Copy and paste it into the LCweb dashboard, on your website
In case you have an intranet or localhost website (or your server is blocking external communications against the LCweb endpoint) you can use the offline activation.
Click on the related link (in the LCweb Dashboard) and fill in the form with the requested data: the offline token can be found following the steps listed above.
Uploaded files are stored into this folder:
../wp-content/uploads/pc_files
Before start using you have to check a couple of server details:
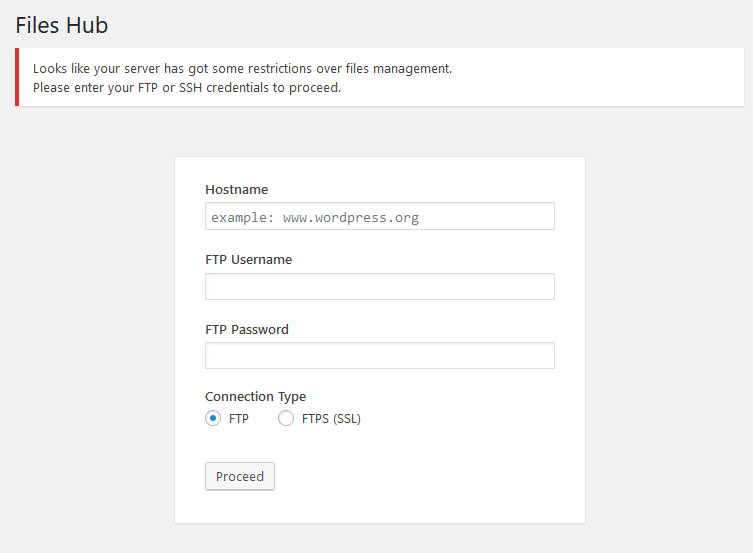
Files management permissions
Some servers have got restrictions over file and folders management, requiring FTP/SSH credentials.
Each time you enter the Files Hub page, the add-on checks these permissions.
If it cannot manage files, the warning with credentials form it's shown.
Maximum file size limit
Each server has got a size limit defined by the hoster.
The add-on panel shows it in the "Restricted Files" tab
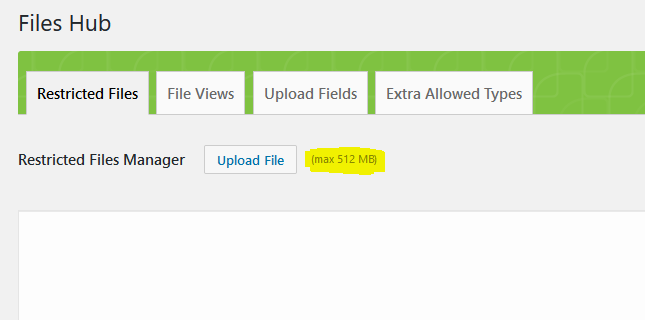
If it's too low for your needs, you can try asking the hoster for an increase.
There are few global options added among PrivateContent settings ("main options" tab).

- Files delivery error method
-
By default a blank page with the message is displayed. However you can target a specific site page to move users to. In this case, please check carefully the red legend aside of the field to avoid troubles.
- Use file URL in compatibility mode?
-
This option has been added exclusively for servers/websites with a specific routing configuration having troubles with "tweaked" URLs containing a file extensio.
By default WordPress supports a wide variety of file types.
However you may need to allow specific file types
The first step to allow frontend file uploads or to directly upload user private files is to create fields
The importance of subtypes
It will define how the field will be usable in the website:
- basic ones will be usable in PrivateContent forms and files will be kept in a unique container
- Folder-related ones will have the capability of split files in multiple subfolders managed by admin and/or the user, depending on the configuration. On frontend they will be exclusively usable through the Users Files Manager and Files View modules.
- Common subfolders: the structure is common for every user and managed in the fields builder interface
- Admin-defined subfolders: each user has got a dedicated structure. It can be managed exclusively by admins in the user dashboard
- Free folders structure: each user has got a dedicated structure. It can be managed by admins in the user dashboard and also users can do the same through a Users Files Manager module
Some notes about fields:
- Maximum files
-
Defines how many files each folder may contain
- Maximum file size
-
Remember it is expressed in KB and that 1KB is 1024 bytes.
Then to set a 1MB limit you don't have to use 1000 but 1024 value. - Image-related fields
-
As soon as you specify an image file type among allowed ones, the plugin will show specific image size validation fields.
Use a zero value to skip those validations. - Frontend layout
-
This option is essentially addressed to multi-column frontend forms.
By default the add-on will display uploaded files into a single column, while using "full-width" files will be columnized - Folders status
-
You can control how users may interact with admin-managed folders: is possible to block uploads and lock folder files. Locking a folder, the files within won't be deletable or movable on other folders
As soon as you create upload fields, basic ones will be automatically integrated into the PrivateContent form framework.
This means you can include them in registration forms as well as in data-update forms created through User Data add-on

To privately upload files to a single user you can also avoid using frontend upload fields, into each User Dashboard you will see a new tab called "User Files" where upload fields will be listed.
Each field will show user uploaded files, but also allows you to directly upload files.
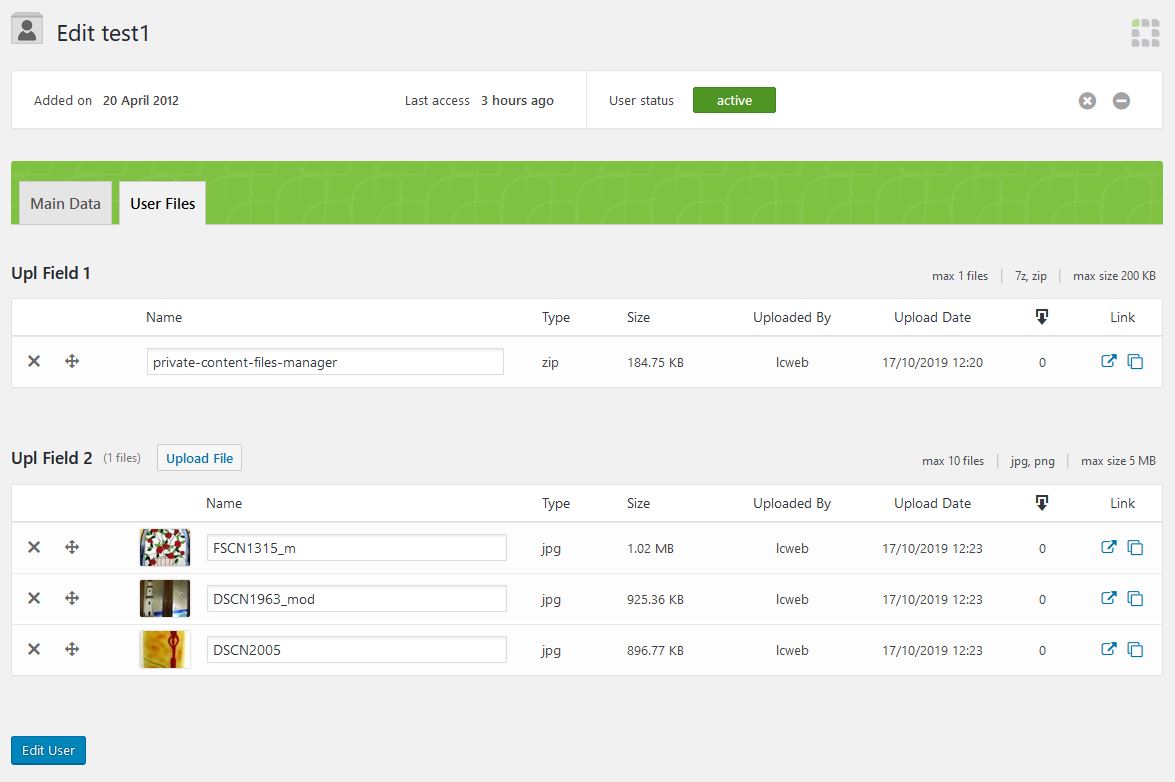
This allows your users to interact with folders-based upload fields: explore, upload and manage their files. Depending on the field subtype, they will be also entitled to create their own folders structure.
This add-on is also natively integrated with with WordPress Block Editor (Gutenberg), Visual Composer, Elementor and Divi.
Using them, you can skip the standard shortcode wizard and use the related PrivateContent tool.
For any other builder or using the old WordPress editor just open the PrivateContent shortcode wizard and select "PCFM - User Files Manager" from the shortcode's dropdown list. Select the view you want to show and click on "insert".
Here's a demo shortcode:
[pcfm-files-view field_id="my-upload-field" files_per_page="20" sorting="id_asc" date_format="Y-m-d H:i"]
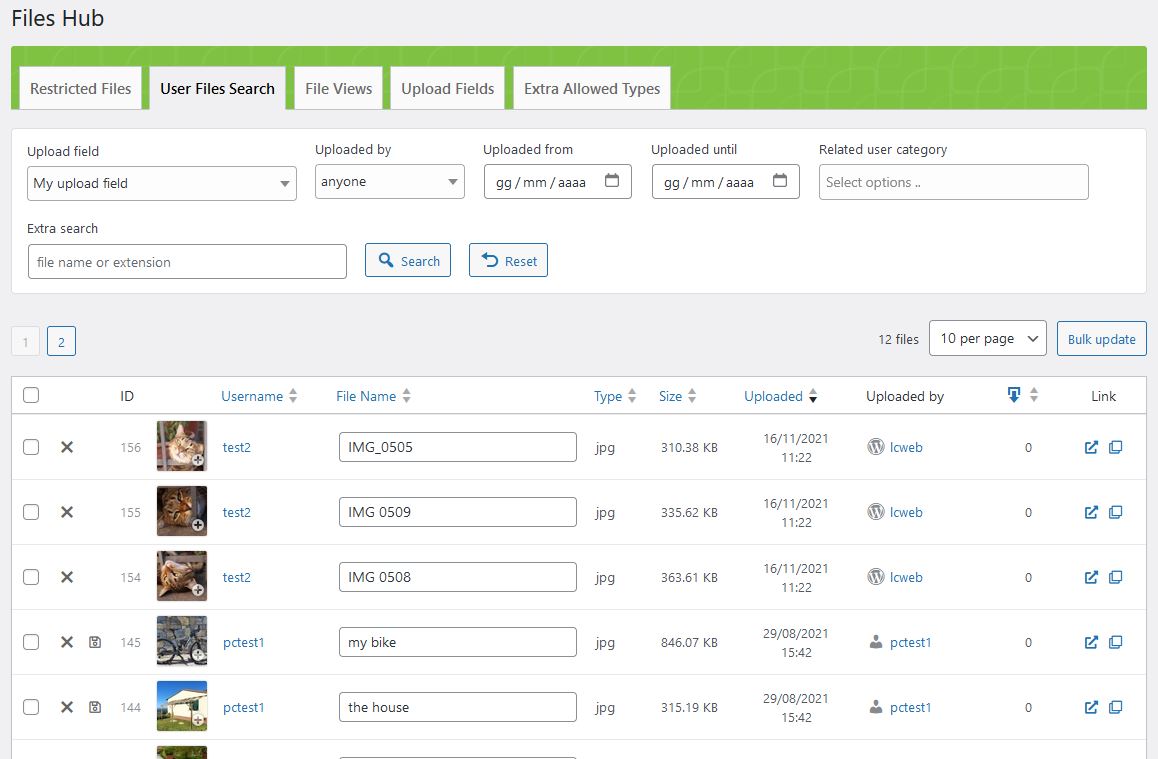
This section wraps up user files by upload field (and search can be skimmed by other parameters).
Files can be bulk managed, for an optimized working overflow.
This system requires Mail Actions add-on
As first, go in the Mail Actions add-on settings page and enable/configure the notification e-mail

Once enabled, a new button will appear as soon as you upload files in the user dashboard
In the "restricted files" tab you can upload files that will be accessible only by targeted user levels.

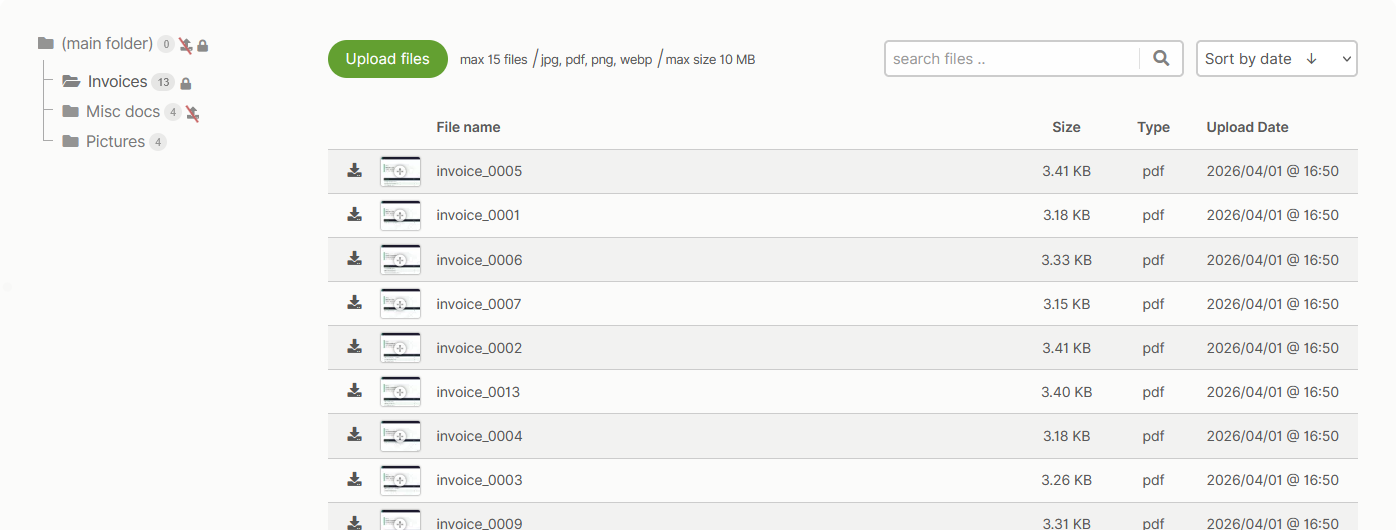
To use folders isn't mandatory, you can also just put everything inside the root folder.
However, as good practice, in most cases is better to have a precise folders structure to keep everything clean and easier to be used through time.
Folders can be restricted and subfolders inherit restrictions.
Obviously each file contained in a restricted folder will inherit those restrictions.
To stop che chained restrictions structure, just define a precise restrictions for the subfolder/file.
For example:
- You have a parent folder allowing User Category 1
- By default Subfolder 1 and contained files will show files only to User Category 1
- If you set a file to allow Any logged user, it will ignore parent restrictions
You can sort & search files as you prefer to better orientate.
The TAGS field could be very important to show targeted files in future: it allows comma split words.
Download limits
Each folder can set a specific download limit for each file within.
The limit applies to the single logged user: once reached the limit, an error message will be returned.
You might want to use the add-on file views to display files also to external/unlogged users.
Only folders can be set as public: all the contained files (unless you define specific restrictions) will be public
File views are essentially ways to display stored files onto your website.
If you want to let users view and manage their files instead, you should use the Users Files Manager module.
Notes:
- File Views targeting specific file types
-
These ones will show exclusively selected file types, ignoring other ones you might have in the targeted folder
- Images Gallery - images only (jpg, png, gif, svg, webp, avif)
- Media Preview - all of the above images + videos (mp4, webm, ogv) + PDF
- Avatar - one single image
- Image-based layouts - Thumbnails
-
Turn it on to speed up frontend image's loading.
However it requires server permissions over direct files management: if you face issues loading images, keep it off. - Random files sorting with User files
-
Into the user dashboard > user files, each files has got a "move" icon to reorder files
- Restricted files - dynamic search
-
You have to type one or more search terms (comma split) matching files.
Here you can take advantge of file tags: grouping various files just typing a single word.The search will ignore folders, grouping any file found
This add-on is also natively integrated with with WordPress Block Editor (Gutenberg), Visual Composer, Elementor and Divi.
Using them, you can skip the standard shortcode wizard and use the related PrivateContent tool.
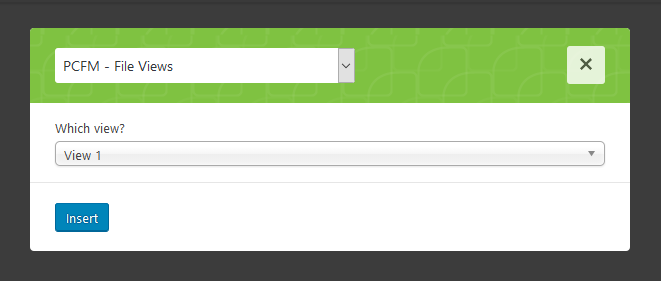
For any other builder or using the old WordPress editor just open the PrivateContent shortcode wizard and select "PCFM - File Views" from the shortcode's dropdown list.
Select the view you want to show and click on "insert".
Here's a demo shortcode:
[pcfm-files-view id="223"]
Alternatively you can always use the direct file link. It can be copied in each files list table

They can be treated as normal file type links.
Then into HTML image or video (etc.) tags, as well as video players.
The add-on gives you a way to show/hide contents in your pages by checking whether logged user has or hasn't got at least a file for a specific upload field.
It is also natively integrated with with WordPress Block Editor (Gutenberg), WP Bakery, Elementor and Divi.
Using them, you can skip the standard shortcode wizard and use the related block.
The shortcode is obviously integrated in the PrivateContent shortcode wizard.
Here's the code with related parameters:
[pcfm-user-has-file cond="true|false" field=""]
    ... contents ...
[/pcfm-user-has-file]| cond | "true" if you want to show contents if user HAS got a file, otherwise "false" |
|---|---|
| field | upload field slug |
The best and easiest way to get insights about when/how/who download files is to use the dedicated PrivateContent User Activities add-on.
Otherwise, the add-on send events to Google analytics (be sure you have the Google Analytics tracking code set in PrivateContent settings).
The add-on is 100% multilanguage for both front and back ends. If a translation of your language has been created, WordPress will automatically switch between languages. Plus it is compatible with WPML and Polylang!
How to create a translation
If you have WPML + String Translation add-on or Polylang, you can simply scan the plugin and translate strings via its UI.
Otherwise: go in the plugin folder, you'll find a two folders called "languages" and "lang_admin".
Inside you'll find the default.pot file. It contains english strings to be translated.
If you want to create or customize your language translation, follow these steps:
- Open the default.pot file with POedit
- Edit the catalog by inserting your data and setting translation's language
- Save the file with your language's i18n identifier and "pcfm_ml-" prefix (the italian example is pcfm_ml-it_IT)
- Go to the plugin folder ".. wp-content/plugins/private-content-files-manager/languages" and paste resulting .PO and .MO files
If you create new translations, please contact me at [email protected] sending your .PO and .MO files.
Otherwise they will be lost in next updates. Thanks!