PrivateContent User Activities add-on
Documentation for v1.1 and later
Before going through documentation chapters, thanks for purchasing PrivateContent User Activities add-on and trusting LCweb!
Need further help?
Need a customization?
Everything needs to be managed and set up in the "User Activities" submenu of the "PvtCont add-ons" admin menu
On first plugin's activation, it must be activated in order to work.
Head to the LCweb Dashboard page: it contains the summary of all LCweb products with useful links and their validation forms.

LCweb Shop License:
Your license is automatically registered into the LCweb database, you only need to
- go to your licenses dashboard and select the section your product belongs to (if you own only one product, you will be automatically moved)
- Scroll down until you find the license you want to use for the website and click on the pencil button
- Insert the website domain and save. The system will give you the activation token
- Copy and paste it into the LCweb dashboard, on your website
Envato Marketplace License:
In this case you need to manually register on the LCweb Licenses Hub
- Go to the LCweb Licenses Hub and, if you never registered, do it. You will have to validate your e-mail and use a login token in order to enter.
- Once you are in, select the section your product belongs to (if you own only one product, you will be automatically moved)
- Scroll down until you find the product and click on the PLUS button. A form will prompt you to enter the Envato purchase code (how to get it?) and the website domain
- Once saved, the system will give you the activation token
- Copy and paste it into the LCweb dashboard, on your website
In case you have an intranet or localhost website (or your server is blocking external communications against the LCweb endpoint) you can use the offline activation.
Click on the related link (in the LCweb Dashboard) and fill in the form with the requested data: the offline token can be found following the steps listed above.
The engine has been designed to be as simple as possible, while being a powerful tool to track any potential event a logged user might perform on your website. Although is necessary to understand how it operates in order to manage it.

- ACTIVITY TYPES
Define what is being tracked (eg. a page view, click on something, user login, etc) - ACTIVITY TRIGGERS
Define which event is used to register a new activity performed by a user (eg. click on element X to trigger activity Y).
This step exists to be able to trigger the same activity type through multiple events. - ACTIVITY REPORTS
Are used to show up stored activities and related meta data
These steps must be done in this precise order.
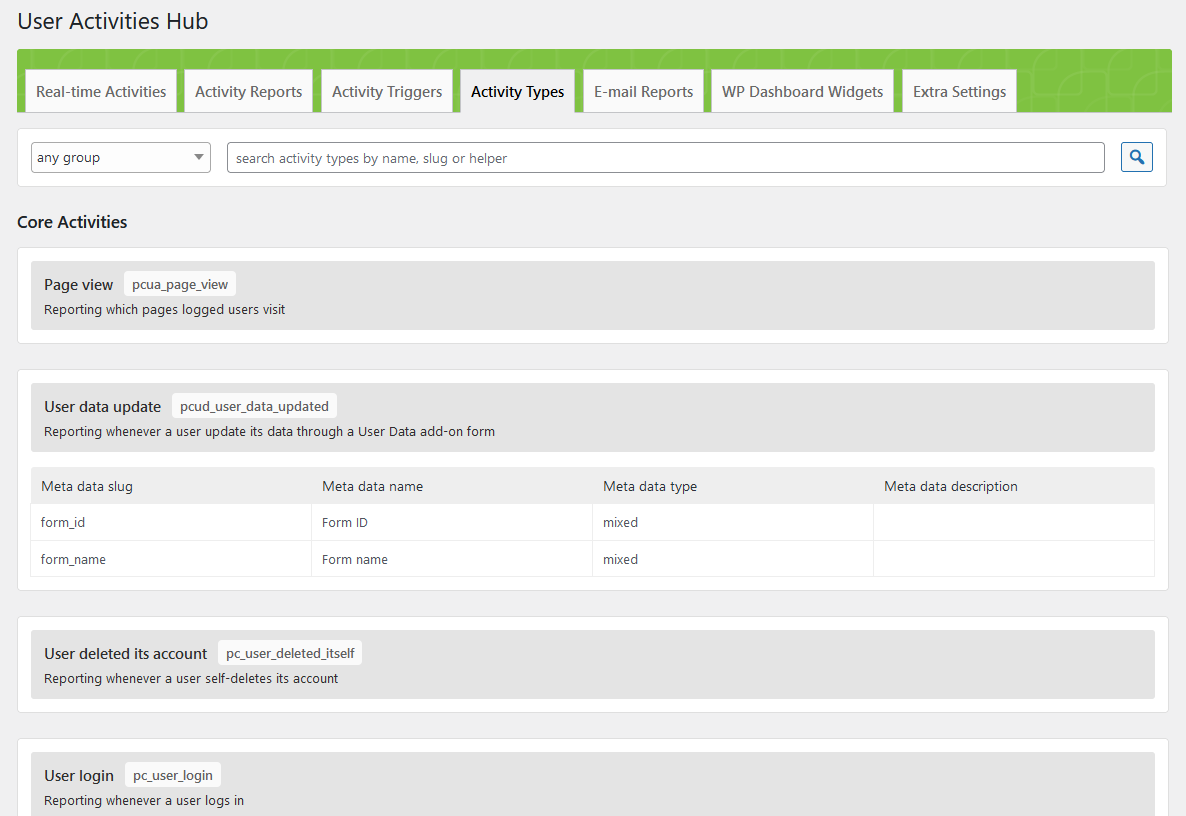
As written in the workflow chapter, they define what is being tracked.
PrivateContent and all its add-ons automatically register various activity types to be used. They wrap all the various activities a logged user might preform through PrivateContent suite systems.
You can also add your custom activity types:
- Activity meta data
-
Totally optional, they are meant to store extra values for each recorded activity.
Can be a very powerful companion for your reports, in fact you can apply filters to fetch very targeted activities (eg. show activities where meta X contains a specific word)Check the following triggers chapter to know how they are filled.
By default every activity records the linked user ID and the website page where it has been performed. - Numeric meta data type
-
They are essential to create reports based on values sum rather than activities count.
For example Premium Plans add-on uses it to track paid subscriptions amount. In this way you can know how many users performed a paid subscription and also how much you earned from them!
They must be exclusively filled with numeric values.
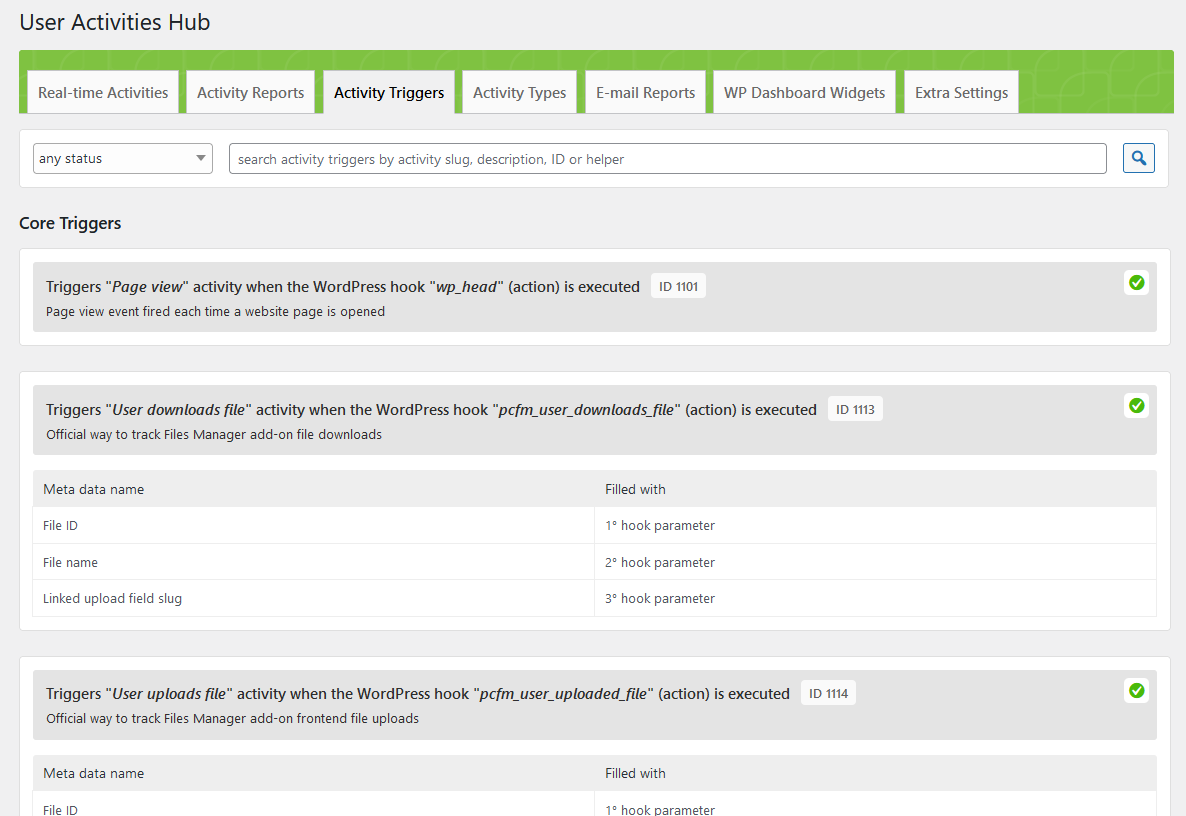
As written in the workflow chapter, they define which event is used to register a new activity performed by a user.
PrivateContent and all its add-ons automatically register various activity triggers ready to be used.
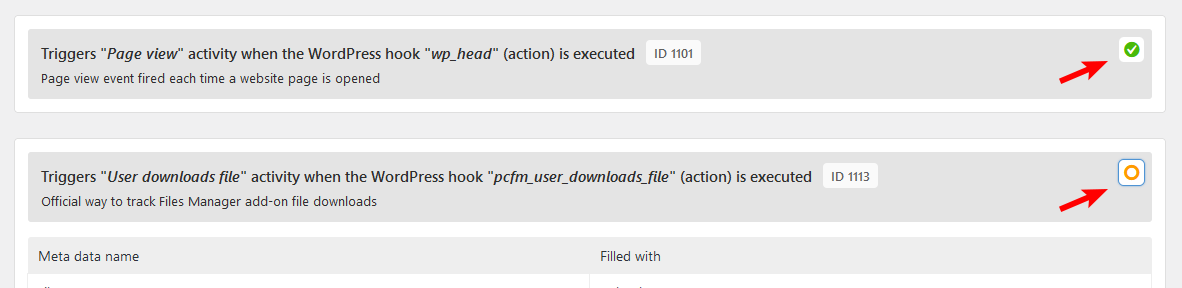
They must be enabled: maybe you want to track only certain activities without flooding your database with unwanted data.
A clickable orange/green icon will tell you the trigger status.
You can also add your custom triggers:
This step inevitably requires skills: activities are triggered through a WordPress hook (action or filter) or javascript event.
You must be able to precisely fill the form, to target the right WP hook (here you can see a list of default hooks) or the Javascript element selector (might be a class or ID DOM element selector or also the special "document" and "window" keywords).
For example the default "Page View" activity is triggered as soon as WordPress fires the "wp_head" action hook.
While a javascript example would be to trigger a "button clicked" event when user performs a "click" event on the ".my_button" element.
Meta data filling
Prior note: you can fill one or more metas through a trigger. There is not a specific filling requirement.
- WordPress hook
-
You can use a string representing a callable PHP function name (eg. "my_function") or numbers, representing the related hook parameter.
Let's make an example with this custom hook passing two parameters:do_action("my_action", $param_1, $param_2);Using the number "1" you will use $param_1 value to fill the meta value.
- Javascript event
-
You can use a javascript string returning a value (eg. a function invokation) or retrieving an event parameter value or (jQuery only) numbers, representing the related event parameter.
About event parameter: it is passed through the "e" variable.
For example to get targeted DOM element involved in the event, you can use the "e.target" string.About numbers, let's make an example with this custom event passing two parameters:
$(window).trigger("my_event", [param_1, param_2]);Using the number "1" you will use param_1 value to fill the meta value.
Might take a little bit to be understood, but once you get it, you will be literally able to track any event a logged user might do on your website.
Only two limitations:
- Activities are recorded only for logged users (check the public API chapter to know how trigger an activity also if user session is not set)
- The "earlier" WordPress hook you can use is "init" with a priority of "301"
If you want to create a custom trigger but not skilled enough to use the add-on tools, please ask for help through a support ticket
Working live on your website, the add-on is able to give you a real-time report of triggered user activities on your website.
NB: the system has got a fetching interval of 15 seconds, going under this threshold your server could be seriously weighed down.
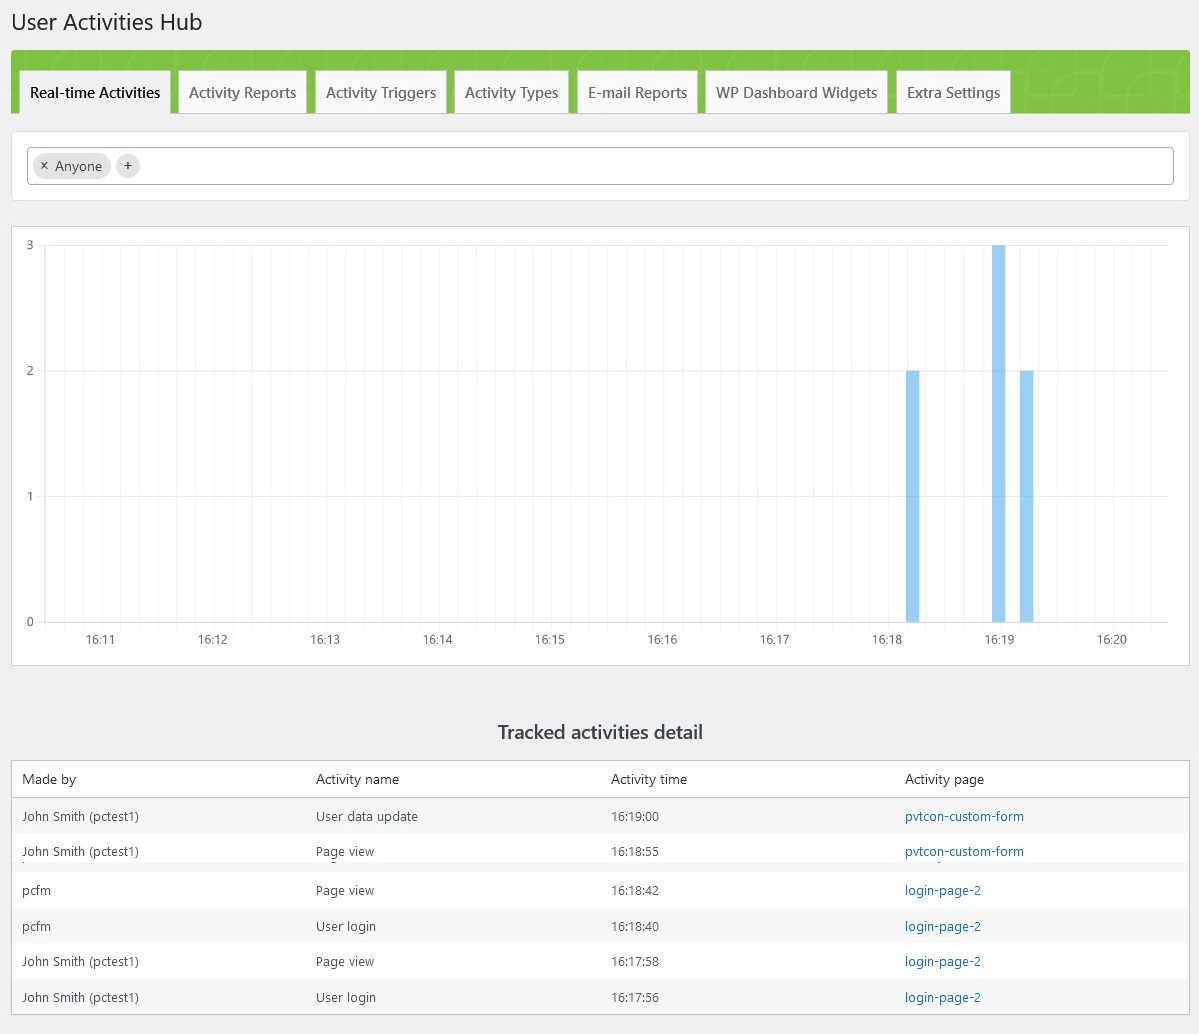
The add-on's core: know user activities in the most detailed way possible.
Here's a short video about its usage:
Let's analyze each interface piece in details:
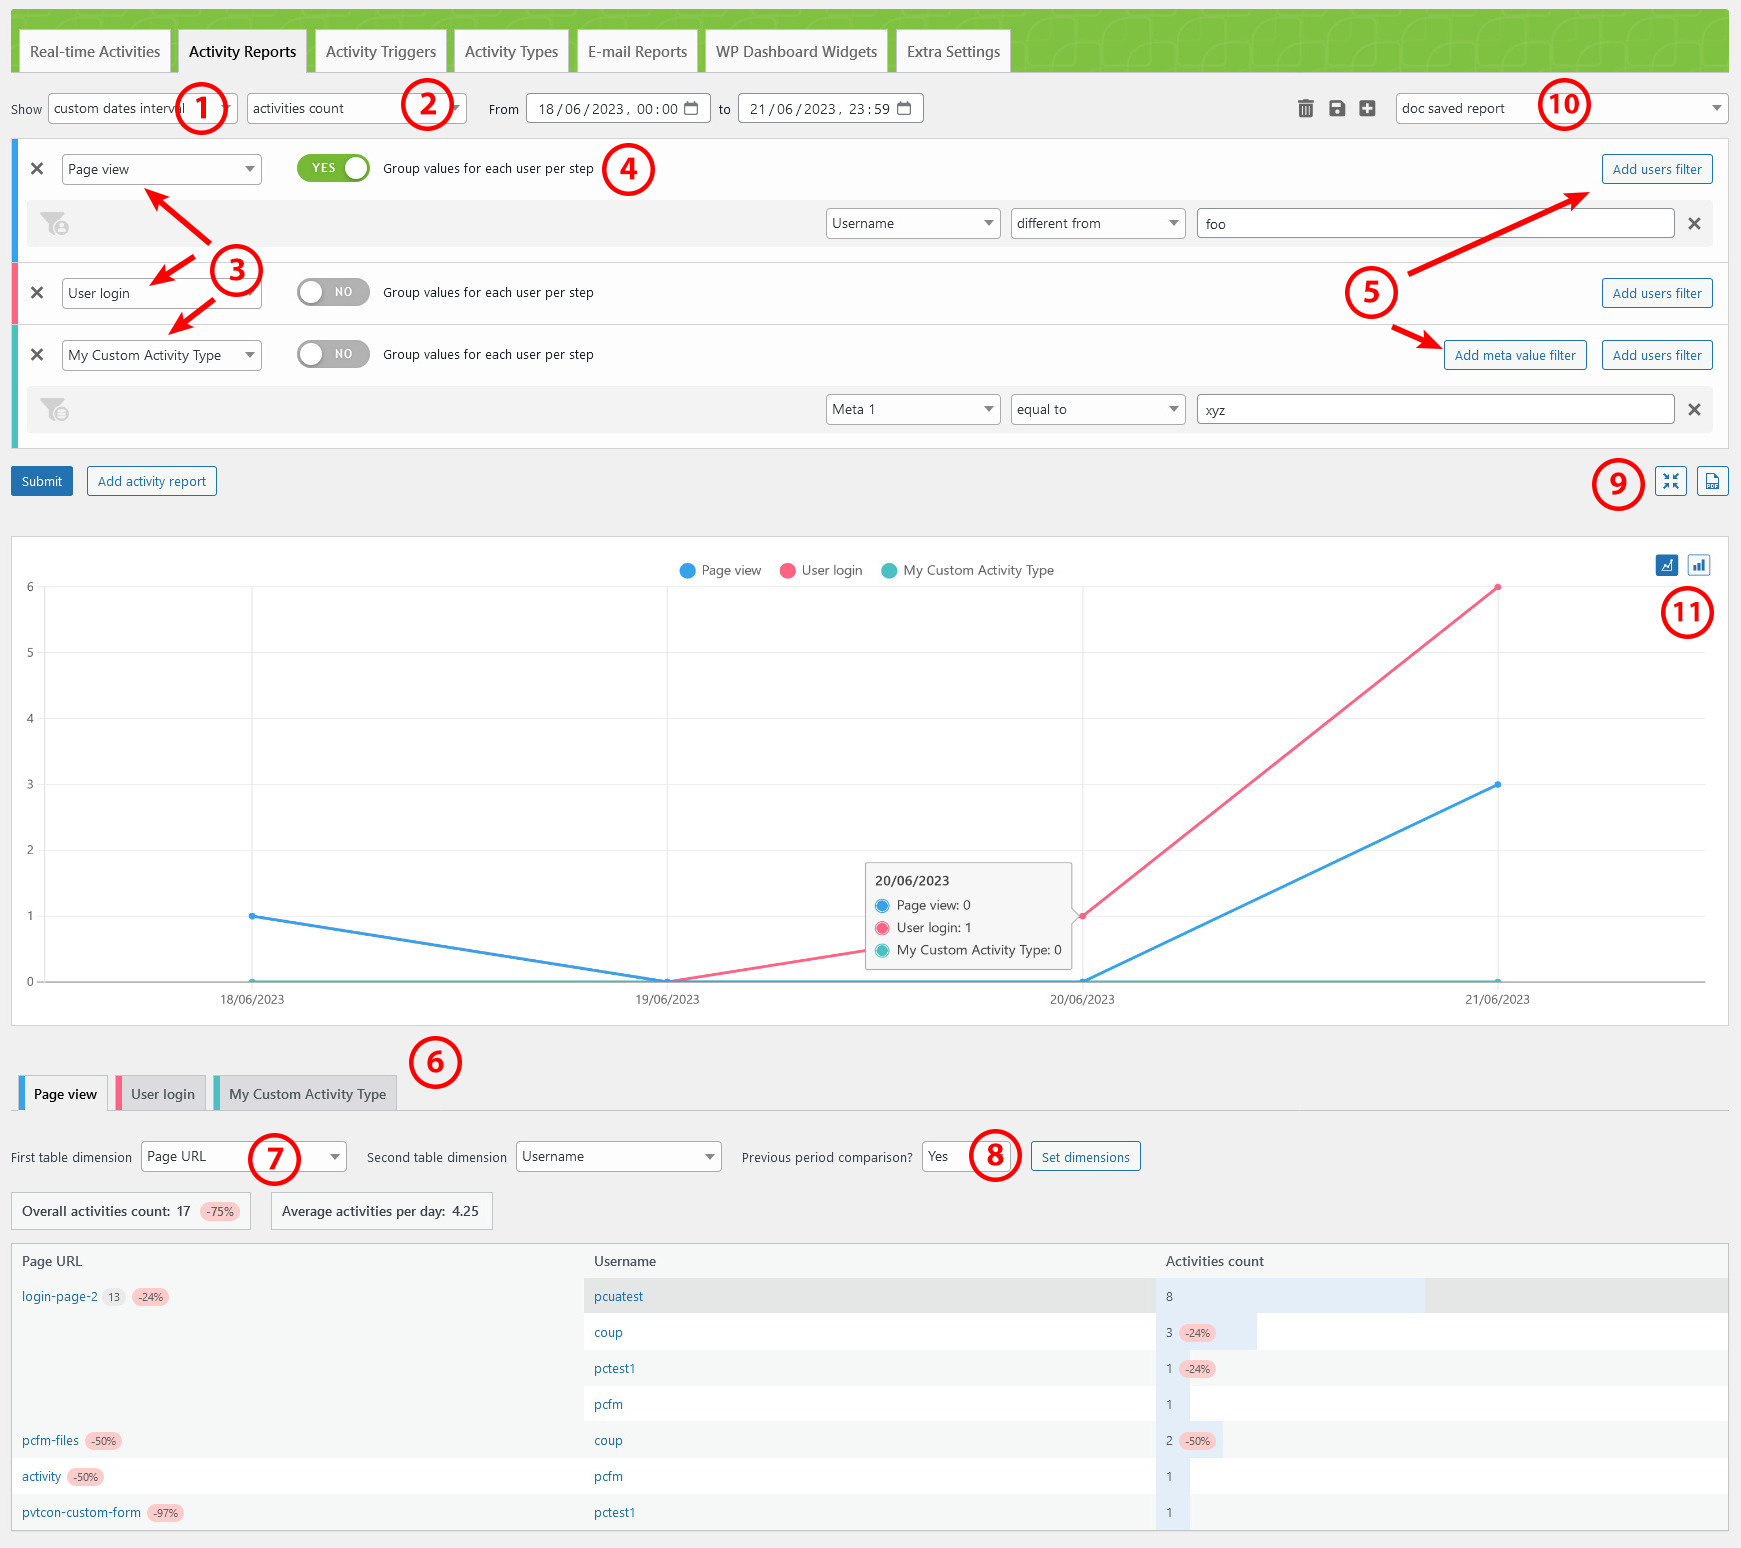
- As first, define the target period to fetch activities from. There are several pre-set time spans, otherwise you can choose whatever period you want. You can even target a single hour period: the chart underneath will adapt to your choice, showing data split per month, day, hour or even minute!
- The report subject: normally it's about activities count over time, but having numeric metas (check the activity types chapter to know more) you can set it to display the numeric count for the chosen period.
- Each table row represents an activity type (or numeric meta) to include in the report. Adding several types you can easily analyze different user behaviors for the chosen period.
-
The "Group values for each user per step" option will group fetched values for each user for each chart step. Could be very important to know activity type statistics ignoring users perforing multiple times the same action.
For example: know how many users logged in a single day. Checking this option even having users having performed the login or 3 times, it will count as one.
-
Filters can be set for each chosen activity: could be a user or an activity meta filter. Multiple filters per activity will be chained using the AND condition (all of them must be satisfied).
A smart usage could be to choose two identical activity types and apply different filters, in order to cover different user/activity segments.
- Choosing multiple activity types, underneath the chart, you have clickable tabs, showing the full activities report related to the report configuration row (colors are used to better orientate).
-
The activities report is configurable using one or two dimensions: they are the essentially the key used to group fetched activities. The table will show how the activities count (or numeric meta sum) you have got for each dimension subject.
The second dimension will simply add a new distinction among first dimension activities. Taking the above screnshot as example:
- First dimension has been set on "page URL", then the add-on splits fetched activities by the page URL where they have been performed
- The second dimension "username" adds a further distinction and shows, for the specific page URL, how many activities a user madeTable results are sorted by activities count.
-
The add-on can even give you a comparison with the same previous period (eg. if you are checking a time span of 3 days, the comparison will scan the past 3 days). Comparison percentages (the ones in red, in the screenshot above) are shown only if you have any activity recorded in the previous period.
A little warning: involving twice the server resource, be careful on using it on low-end servers and having many data to fetch.
- The first button is about report configuration toggle, in case you want to have a better focus on fetched data.
The second downloads a PDF of the currently shown report. - Each report configuration can be saved, to quickly access it and be used in scheduled e-mail reports.
- You can choose whether to dislay the chart using lines or bars (by default the layout chosen in the extra settings is used).
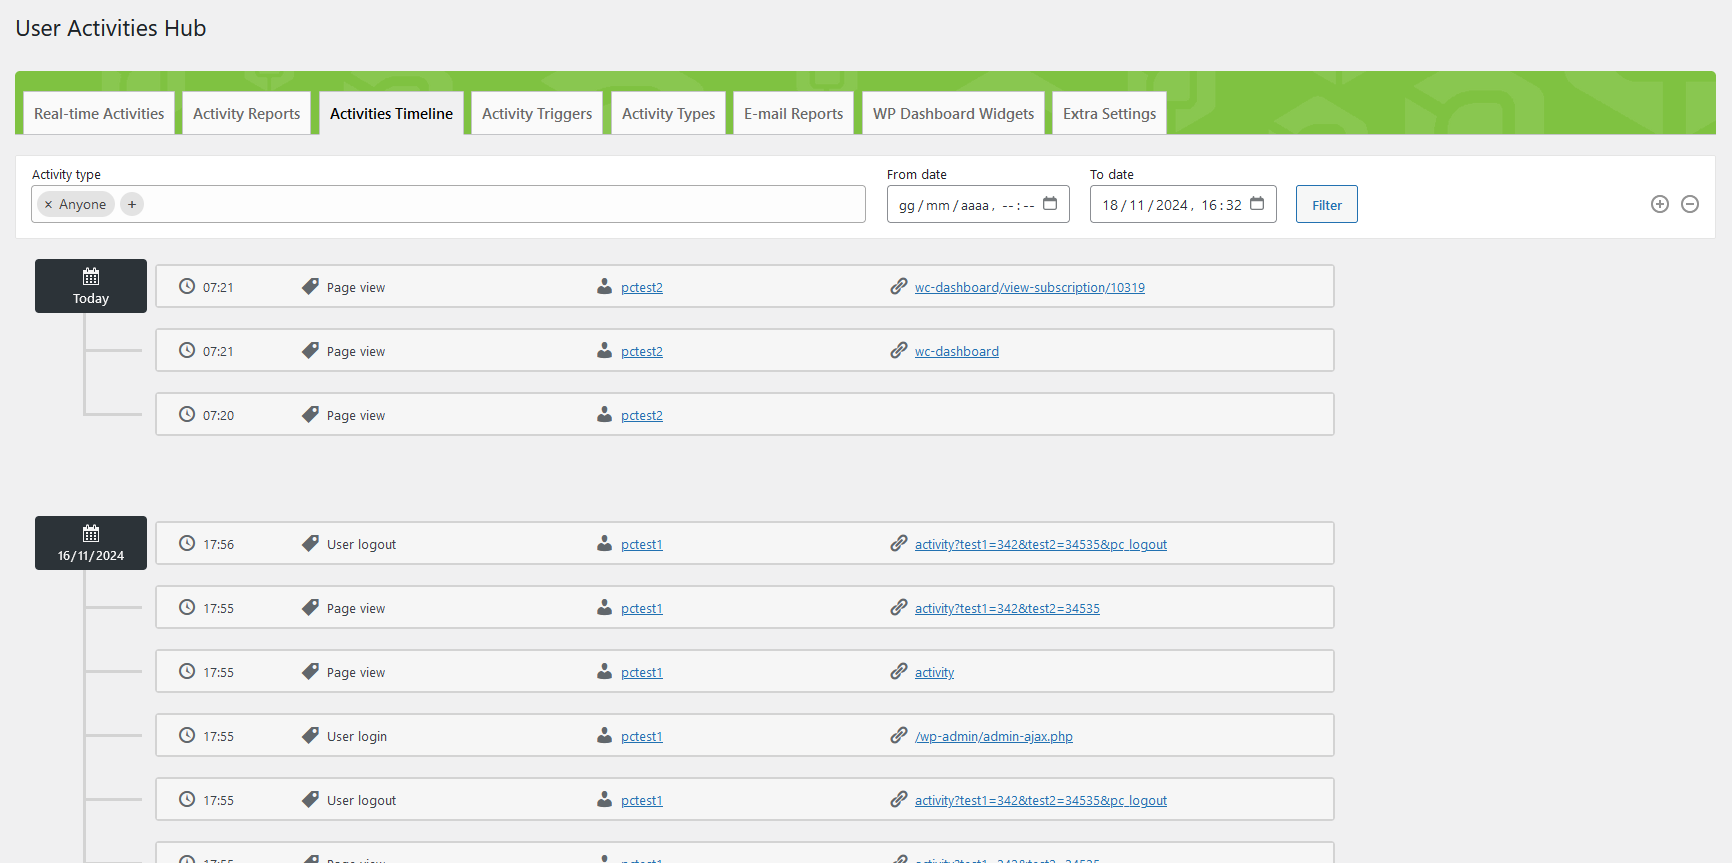
In the User Activities panel you can check the full activities chrono-history. Meta data included.
Performed activities can be filtered per type or execution date.
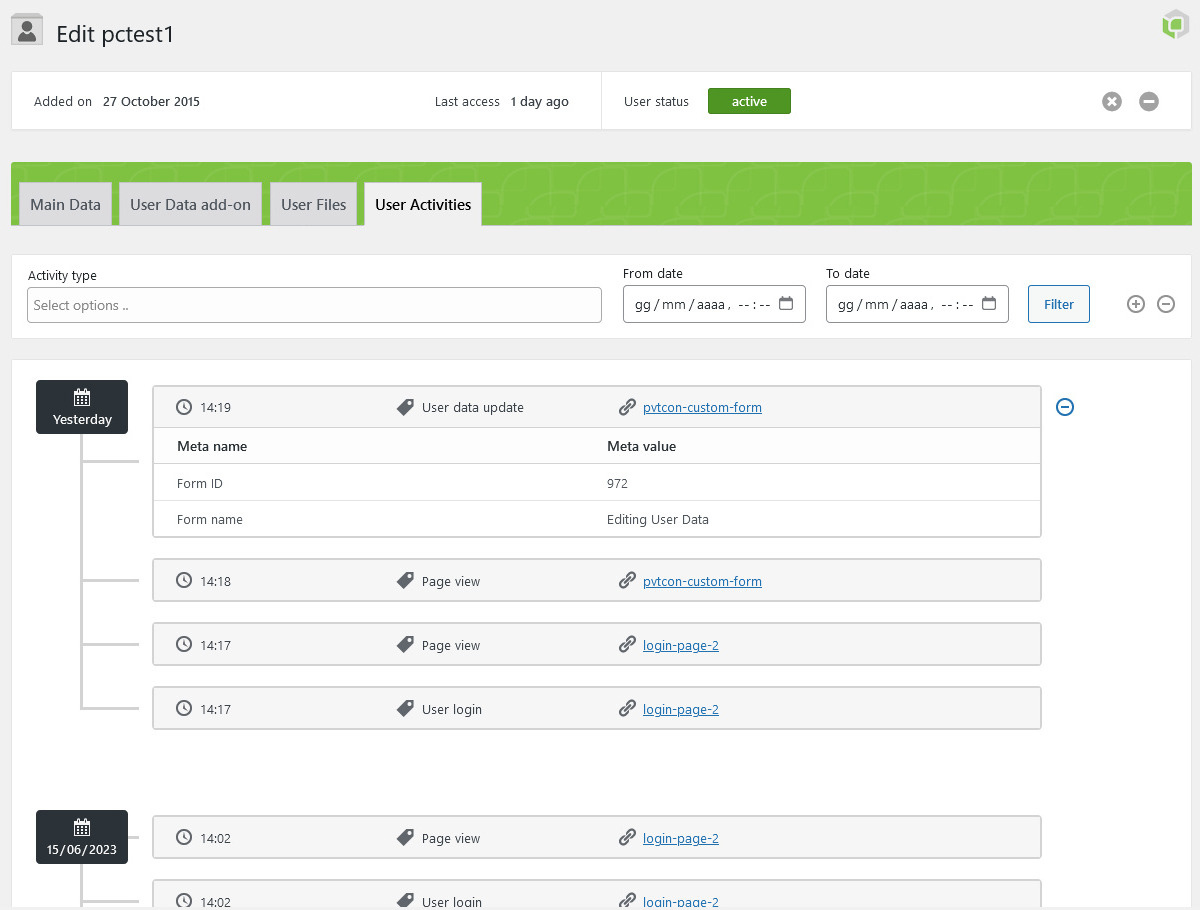
User-specific
If you want to see the timeline related to a single user, simply head to its dashboard
To use this system you must have also Mail Actions add-on installed
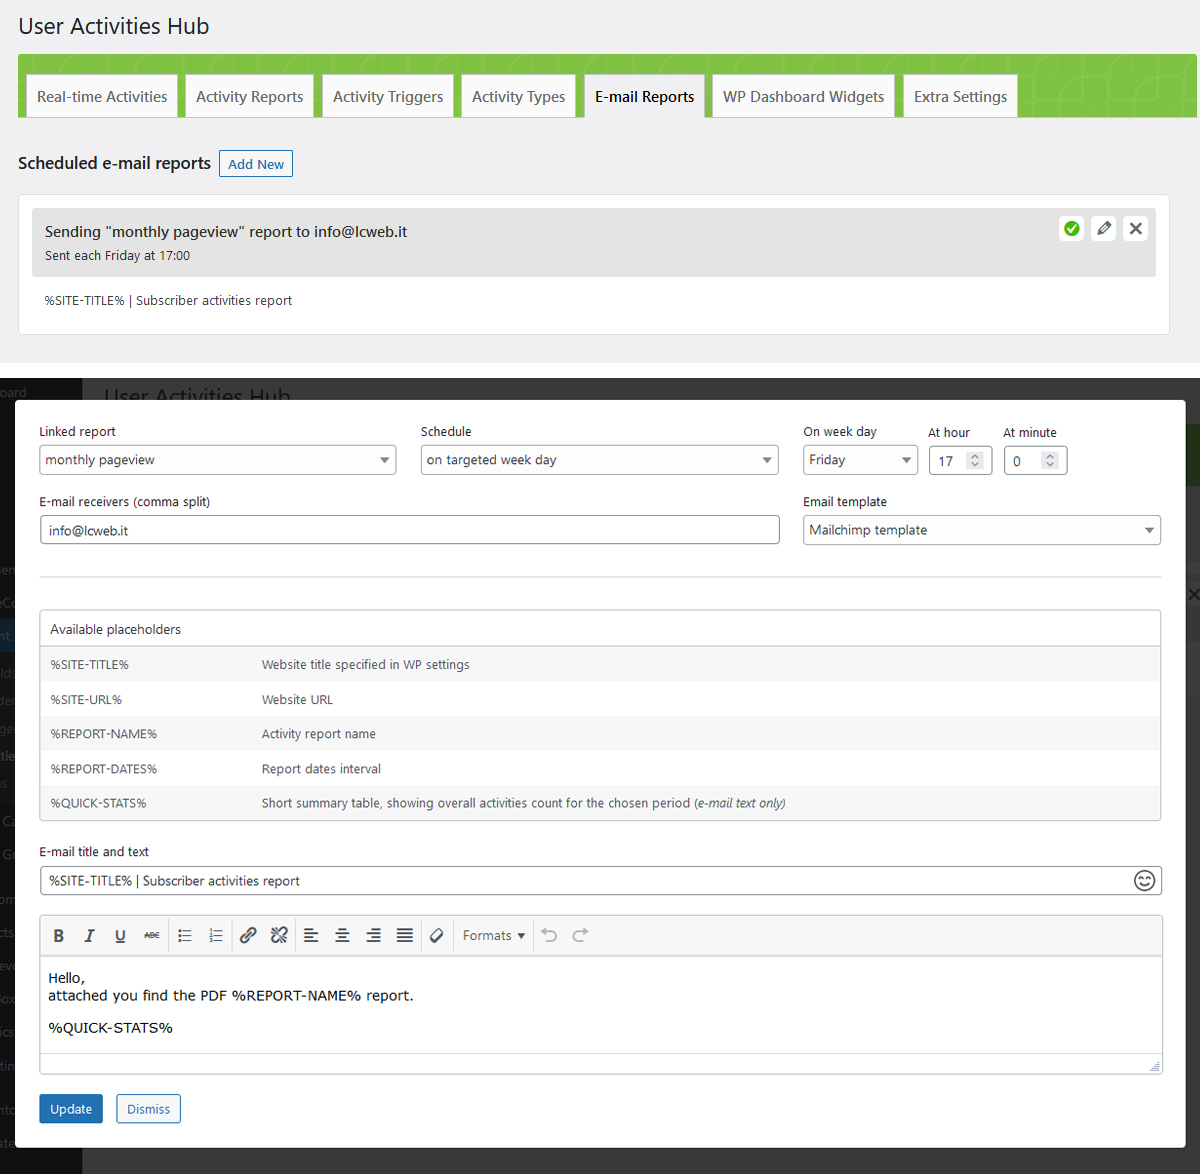
Unlimited scheduled e-mail reports can be created: this means you can programmatically receive an e-mail containing the PDF version of an activities report you previously saved (check the related chapter to know how to do it).
In the creation/update form you will be asked to:
- Target a saved report
- Select when the e-mail has to be sent (hourly, daily, etc)
- The e-mail receivers
- Optionally a Mail Actions add-on e-mail template to use as wrapper
- The e-mail title and texts
Handy placeholders are listed: they will dynamically output contents in the e-mail texts.
Sendings are processed every 5 minutes by the WordPress cron-task engine.
It is triggered every time the website opens, therefore, if your website doesn't have constant visitors, you must setup a server cron-job opening whatever website page on that interval (please ask your hoster if you are not able to do this).
If you need to immediately process pending campaigns, add this parameter to any website page's URL: pcua_process_ser
Might be super handy to have an activities (or numeric meta) counter with previous period comparison included right in your WordPress dashboard:
WP dashboard widgets data fetched is cached for 10 minutes to avoid excessive resources usage on large websites

Option blocks are already split for subject and have legends aside to help you while using them, however worth mentioning some details:
- Data collectionn disclaimer
-
Activities tracking does not use any cookie, therefore is not mandatory have users agreement in order to start tracking their activities. However you might want to ask for a confirmation.
Checking the related option the add-on will add a disclaimer field in the PrivateContent forms engine, to be used in any form.
Havig it checked, only users having agreed to share their data will engage activity triggers. - Monthly step threshold
-
It is an essential parameter to avoid bad results in PDF charts. As written in the legend, going over 60 steps is not suggested as it would end in a confused chart axis.
- PDF Reports header and footer
-
Pieces of code to be prepended/appended to each report page. Please note the PDF creation context only supports basic HTML and CSS: avoid using shortcodes or complex structures. The best way of using it is through the WordPress editor buttons.
Is essential to define a proper header/footer height!
- Delete collected data
- (the red button in bottom-right position) It totally wipes recorded activities and metas from the database. Data will be lost forever, be careful.
The add-on is 100% multilanguage. If a translation of your language has been created, WordPress will automatically switch between languages. Plus it is compatible with WPML and Polylang!
How to create a translation
If you have WPML + String Translation add-on or Polylang, you can simply scan the plugin and translate strings via its UI.
Otherwise: go in the plugin folder, you'll find a folder called "languages".
Inside you'll find the default.pot file. It contains english strings to be translated.
If you want to create or customize your language translation, follow these steps:
- Open the default.pot file with POedit
- Edit the catalog by inserting your data and setting translation's language
- Save the file with your language's i18n identifier and "pcua_ml-" prefix (the italian example is pcua_ml-it_IT)
- Go to the plugin folder ".. wp-content/plugins/private-content-user-activities/languages" and paste resulting .PO and .MO files
If you create new translations, please contact me at [email protected] sending your .PO and .MO files.
Otherwise they will be lost in next updates. Thanks!
If you are a developer, might be convenient to directly register activities at some point of your code.
You can do this both in PHP and Javascript. Obviously this system works only if user is logged in.
Prior note: it can be invoked after the "init" wordpress hook has been fired or within that hook with a minimum priority of 301.
Parameters
| (string) | $act_slug | Activity type slug (must be registered in the add-on engine!) |
|---|---|---|
| (array) (optional) | $params |
Activity parameters: you can override any of those array indexes. Structure with default values: |
|
||
| (array) (optional) | $metas |
Meta data eventually attached to the activity. Array structure: |
|
||
Return values
| (int) | New activity ID on success |
|---|---|
| (string) | Error message |
Example
Creating a user registration activity passing user ID and page URL. Associating also meta data
$params = array(
    "user_id" => 5,
    "url" => "https://mywebste.com/page-xyz"
);

$metas = array(
    "form_id"   => 146,
    "form_name" => "My form"
);

$response = pcua_act_manag::add_activity("pc_user_registration", $params, $metas);

if(is_numeric($response)) {
    // success
} else {
    echo $response; // error
}Prior note: the add-on javascript engine is enqueued as first in the website HEAD. However, it requires variables to be handled and they are outputted later in the HEAD section. Is a good practice to wait for the "document" to be "ready" in order to submit an activity.
The AJAX call performed lives even if the user exits the page!
Parameters
| (string) | act_slug | Activity type slug (must be registered in the add-on engine!) |
|---|---|---|
| (object) (optional) | metas |
Meta data eventually attached to the activity. Object structure: |
|
||
| (int | bool) (optional) | trig_id | Trigger ID linked to the activity. In this context, should be always passed as "false" |
| (bool) (optional) | once_per_page | Whether the activity must be triggered only once in the current website page |
| (string | bool) (optional) | page_url | Page URL where the activity has been performed. By default (passing "false") is the current URL |
| (int | bool) (optional) | user_id | User ID to be associated. By default (passing "false") is the currently logged user ID |
Return values
| (true) | on success |
|---|---|
| (string) | Error message |
Example
Creating a user registration activity passing user ID and page URL. Associating also meta data and triggering it once in the page.
const user_id = 5,
    page_url = "https://mywebste.com/page-xyz",
    metas = {
        "form_id"   => 146,
        "form_name" => "My form"
    };

const response = window.pcua_register_act("pc_user_registration", metas, false, true, page_url, user_id);

if(response === true) {
    // success
} else {
    console.error(response); // error
}