Before going through documentation chapters, thanks for purchasing Advanced Fiters add-on and trusting LCweb!
Need further help?
Need a customization?
On first plugin's activation, it must be activated in order to work.
Head to the LCweb Dashboard page: it contains the summary of all LCweb products with useful links and their validation forms.

LCweb Shop License:
Your license is automatically registered into the LCweb database, you only need to
- go to your licenses dashboard and select the section your product belongs to (if you own only one product, you will be automatically moved)
- Scroll down until you find the license you want to use for the website and click on the pencil button
- Insert the website domain and save. The system will give you the activation token
- Copy and paste it into the LCweb dashboard, on your website
Envato Marketplace License:
In this case you need to manually register on the LCweb Licenses Hub
- Go to the LCweb Licenses Hub and, if you never registered, do it. You will have to validate your e-mail and use a login token in order to enter.
- Once you are in, select the section your product belongs to (if you own only one product, you will be automatically moved)
- Scroll down until you find the product and click on the PLUS button. A form will prompt you to enter the Envato purchase code (how to get it?) and the website domain
- Once saved, the system will give you the activation token
- Copy and paste it into the LCweb dashboard, on your website
In case you have an intranet or localhost website (or your server is blocking external communications against the LCweb endpoint) you can use the offline activation.
Click on the related link (in the LCweb Dashboard) and fill in the form with the requested data: the offline token can be found following the steps listed above.
Once add-on is active, you will see a new submenu under Media Grid, called "Filter Sections".
It's essential to save sections at least once, to populate the add-on sections array
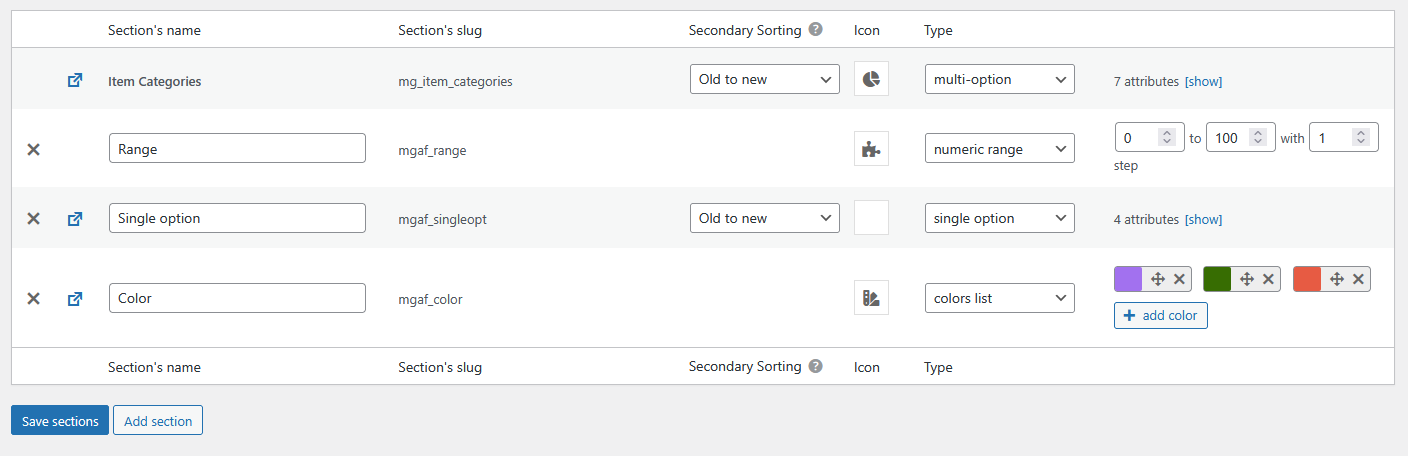
Here are listed sections you can insert into filters.
The first (fixed) row is related to Media Grid item categories, then you can add new ones.
Inserting a new section:
- Insert a name (can be changed in future)
- Insert a slug. It must be unique and can't be changed.
Must also have a proper format: lowercase characters and numbers allowed. Replace spaces with dashes or underscores. - (optional) Assign an icon to filter's name
- (optional) Choose the filter's type
Section types
| multi-option | user will be able to filter items chosing one or more options (works like an OR condition) |
|---|---|
| single option | user will be able to filter items chosing only one option |
| numeric range | here you must define a numeric range (only integer numbers are supported currently) and the interval used by frontend slider |
| colors list | Pick up how many colors you want to filter your grid items by |
Obviously you have to fill single and multi-opt types with options. To do that, just click on  icon and act as you would do on Media Grid categories.
Once sections have been created, you will see a new side box in Media Grid items and posts editor:
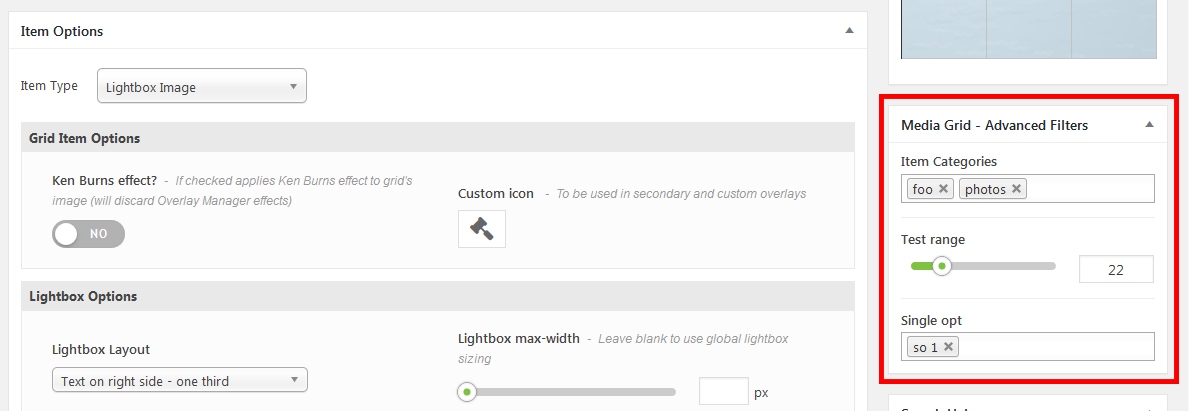
There you find all sections listed and you can insert the options related to the item.
Obviously the box is added also in post types you can use in your grids.
Let's see now how to compose your new filters: click on the "Filters Builder" Media Grid submenu.
Then just add a new filter to the list:
Once added you can set its layout (the upper dropdown), manage related options below it and finally add and sort sections:
Starting from v2 (and Media Grid v9) is possile to sort the grid items.
The sorter must be added and cofigured within the filter builder
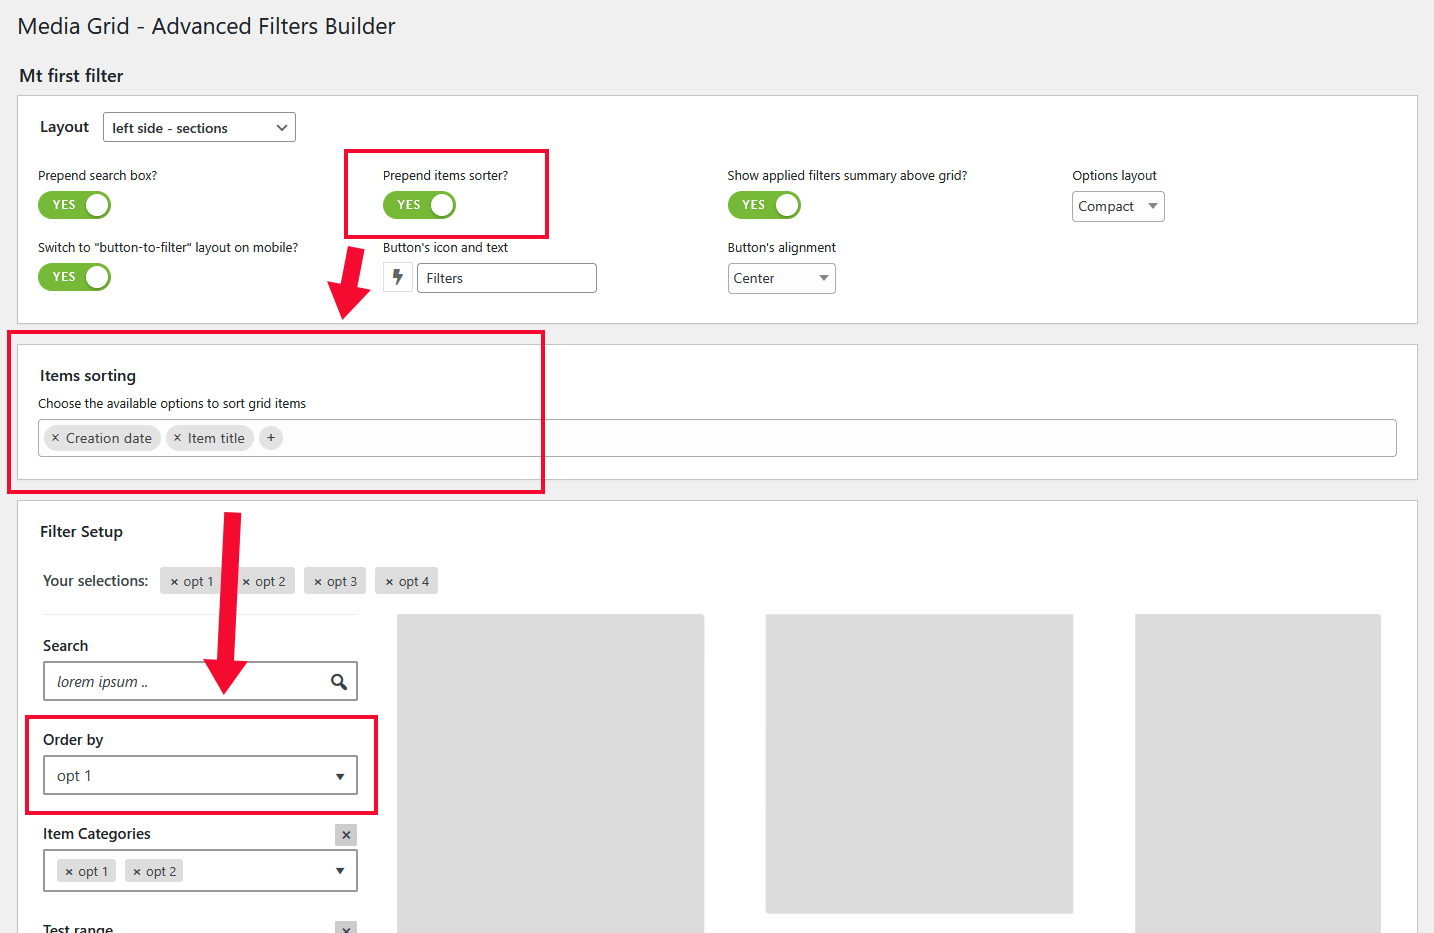
It's possible to sort your items by
- Fixed data (title, creation date)
- Numeric range filter sections (WooCommerce product price included)
- Type attributes you might have added to your items (here's the link to the related documentation chapter)
The sorter will be always placed after the searchbar and before other filters, displayed as a dropdown.
It's possible to extend the deeplink system also to track the sorting method, simply enable it in Media Grid settings > Main Options > Deeplinking.
Filters implementation is the simplest thing you can imagine: using Media Grid shortcode's wizard you will see a sligtly changed interface.
Just choose the filter you want to apply and insert grid's shortcode.
Also remember Media Grid is natively integrated in Elementor and Visual Composer. Using them filters integration is even simpler!
Advanced Filters add-on automatically integrates into WooCommerce by using its attributes and price
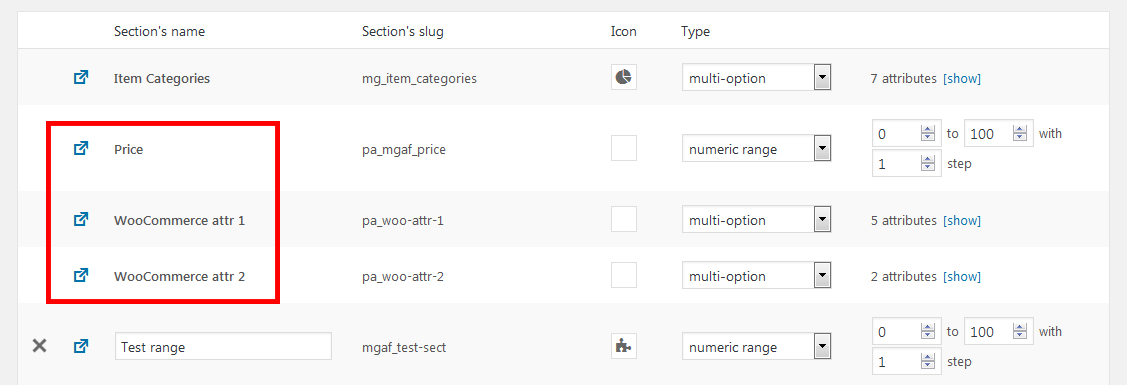
Obviously they will be rendered only if WooCommerce products are found into the grid and can be set only for products.
Terms sorting is the one defined into WC terms management pages.
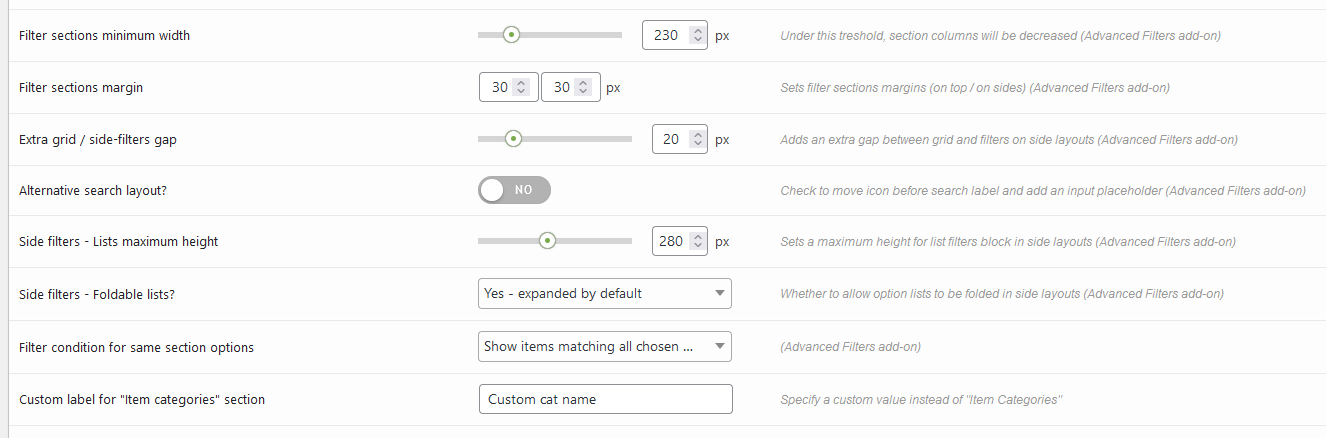
The add-on offers you few option to tune its behaviors by choosing the one you fits better on yout website.
They are injected in among main Media Grid settings (Item Filters - Search - Pagination Elements section)
The plugin is 100% multilanguage for both front and back ends. If a translation of your language has been created, WordPress will automatically switch between languages.
Plus it is compatible with WPML and Polylang!
How to create a translation
If you have WPML + String Translation add-on or Polylang, you can simply scan the plugin and translate strings via its UI.
Otherwise: go in the plugin folder, then open the one named "languages".
Inside you'll find the default.pot file. It contains english strings to be translated.
If you want to create or customize one your language translation, follow these steps:
- Open the default.pot file with POedit
- Edit the catalog by inserting your data and setting translation's language
- Save the file with your language's i18n identifier and "mgaf_ml-" prefix (the italian example is mgaf_ml-it_IT)
- Go to plugin's folder ".. wp-content/plugins/media-grid-advanced-filters/languages" and paste resulting .PO and .MO files
To translate item custom attributes you necessarily need to use the WPML string translation plugin or Polylang.
If you create new translations, please contact me at [email protected] sending your .PO and .MO files.
Otherwise they will be lost in next updates. Thanks!